Sabrinas Organizing

menu icon
go to homepage
  • Home Organization
  • Healthy Recipes
  • DIY Home Projects
  • Browse Gift Ideas
  • Donate Stuff
  • Recycling Events 2025
  • Solution Consultations
  • Virtual Organizing
  • Disclosure Policy and Cookies
search icon
Homepage link
  • Home Organization
  • Healthy Recipes
  • DIY Home Projects
  • Browse Gift Ideas
  • Donate Stuff
  • Recycling Events 2025
  • Solution Consultations
  • Virtual Organizing
  • Disclosure Policy and Cookies
×
Home » Home Organization » Kitchen » How to Make Trash Can Labels

How to Make Trash Can Labels

Last Modified: August 23, 2022 Sabrina Quairoli This blog uses cookies. It also has affiliate links. We earn sponsored content income.

How to make trash can labels featured image

Trash cans (affiliate) are an essential part of a home and office. It helps keep your home clutter-free of items you do not want or need. There are at least two types of trash cans (affiliate) you can have in your home or office - a recycling bin (affiliate) and a trash can (affiliate). While recycling bins (affiliate) can be divided into plastic, glass, and paper bins, we usually have one trash can (affiliate). This week, we will help you dress up those important trash can (affiliate) with trash can (affiliate) labels (affiliate). Follow along and see how cute my trash cans (affiliate) are and how I made them. It's super easy to do when you have the right trash can (affiliate).

Where should I store a recycling bin in your home?

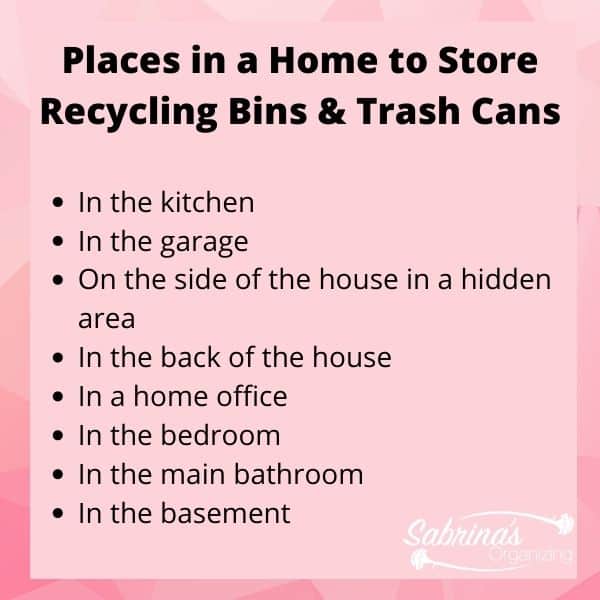
There are several places to hold your recycling bin (affiliate). You can easily have one or more bins to organize your recycled items until you are ready to get rid of them. But, where to place these bins are critical to staying organized. Below are some places where you can store your recycling bin (affiliate) for easy use.

In the kitchen
In the garage (affiliate)
On the side of the house in a hidden area
In the back of the house
In a home office
In the bedroom
In the main bathroom
In the basement

Places in a home to store recycling bins and trash cans

Wherever you decide to store your recycling bin (affiliate), make it a place easily accessible by every member of your family. It should also be close to a door that is used often. If you feel there are a few places in your home that you want to do more recycling, you can add a small labeled recycling bin (affiliate) next to the trash can. And, don't forget to label (affiliate) the bin if it is intended for recycling only.

Now, let's get to the labeling of the recycling and trash cans (affiliate).

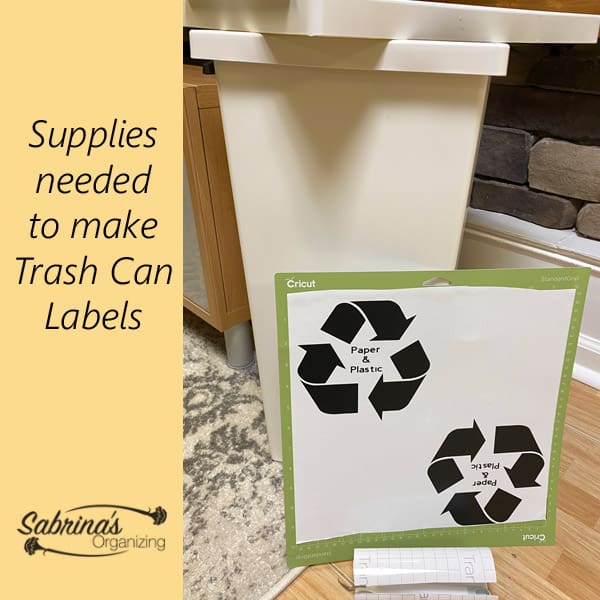
Supplies needed to make Trash Can Labels:

Flat white trash can - I bought these from Ikea.
Cricut Black Vinyl sheet (affiliate link on Cricut (affiliate) website)
Cricut Blue Sage Vinyl sheet (affiliate link on Cricut (affiliate) website)

Tools needed for this trash can labels DIY project:

Cricut Machine Mat and Cricut Explore Air 2 (affiliate link on Cricut (affiliate) website)
Transfer tape (affiliate link on Cricut (affiliate) website)

Supplies needed to make trash can labels

Instructions on how to make Trash Can Labels:

Purchase the right trash can.

I have two of these trash cans from Ikea. One for recycling and one for trash. Follow the instructions below on how I made these trash can labels (affiliate).

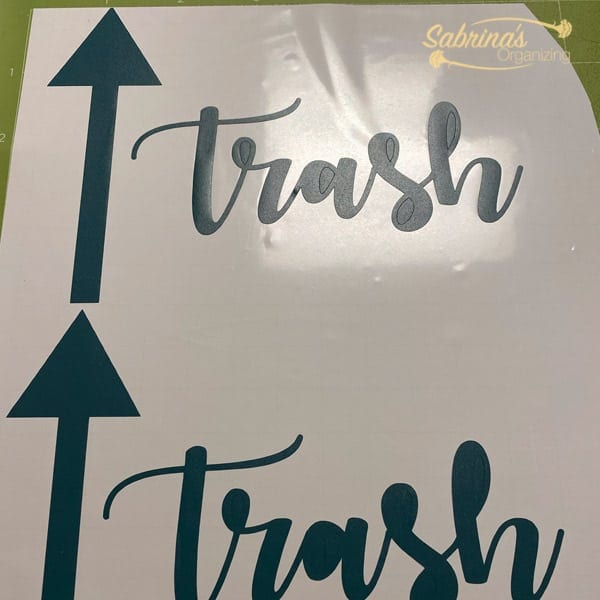
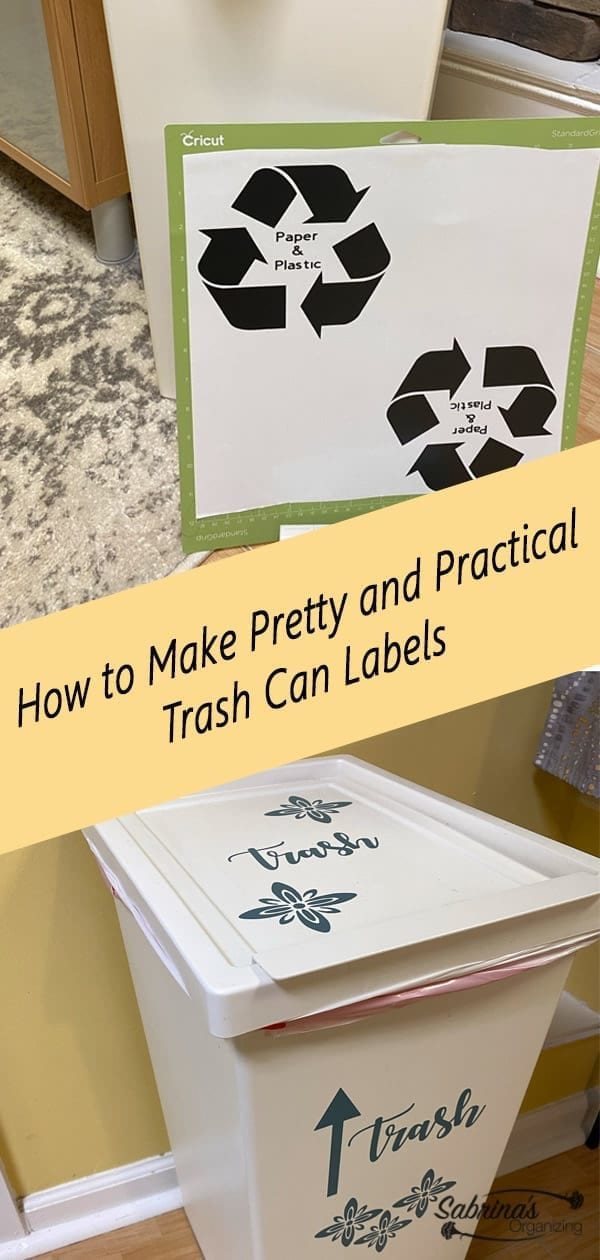
Then create the vinyl labels by using your Cricut Machine.

I used the Cricut (affiliate) Black Vinyl sheet and Cricut Blue Sage Vinyl sheet and cut out the labels (affiliate) using the templates I created below. Feel free to download them for your Cricut Machine (affiliate).

Get a copy of my free Trash Can Label (affiliate): Cricut Recycling Paper and Plastic Cricut Project. Get a copy of my free Trash Can Label (affiliate): Cricut Trash Can Label Project.
Get a copy of my free Trash Can Label (affiliate) to dress up your plan trash can: Cricut Flower project.

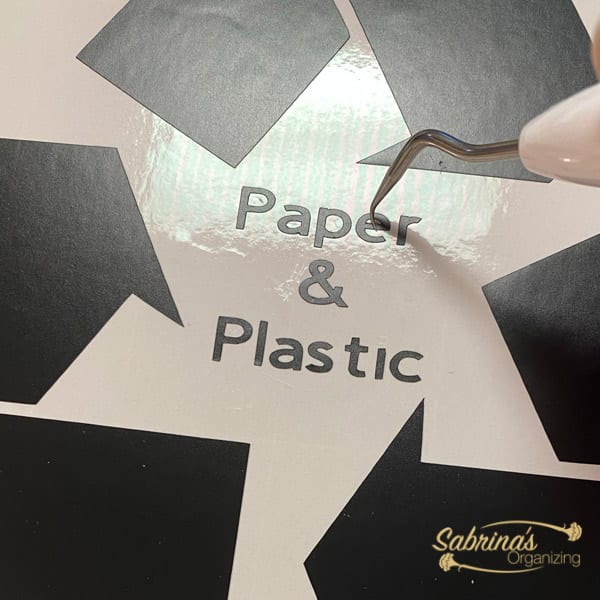
Weed the vinyl and removed anything you do not want to transfer.

Now it is time to remove the excess vinyl you are not using. With the Cricut weeding tool, remove the inside of letters.

Print out the trash labels on the cricut machine
Weed the letters after it is cut

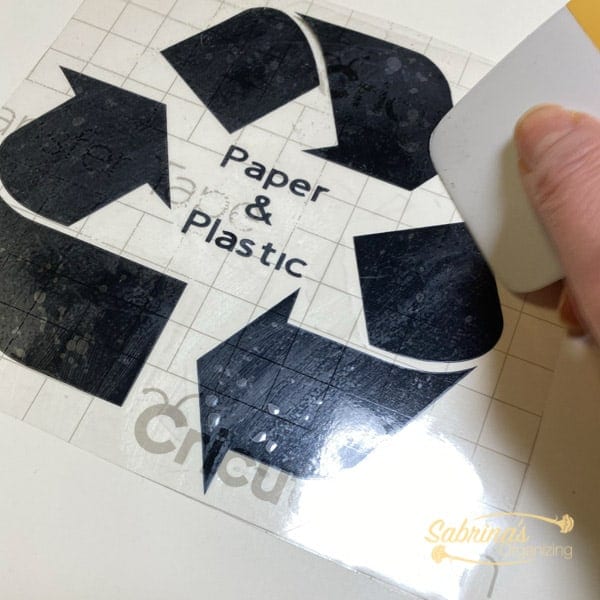
Transfer to the Transfer Tape

Now, it is time to press the transfer sticky side down over the vinyl. Press around the letters and design so it makes contact everywhere. This will help transfer the vinyl to the transfer tape. Peel off.

add transfer paper rub hard to get the design to transfer to the sticky side

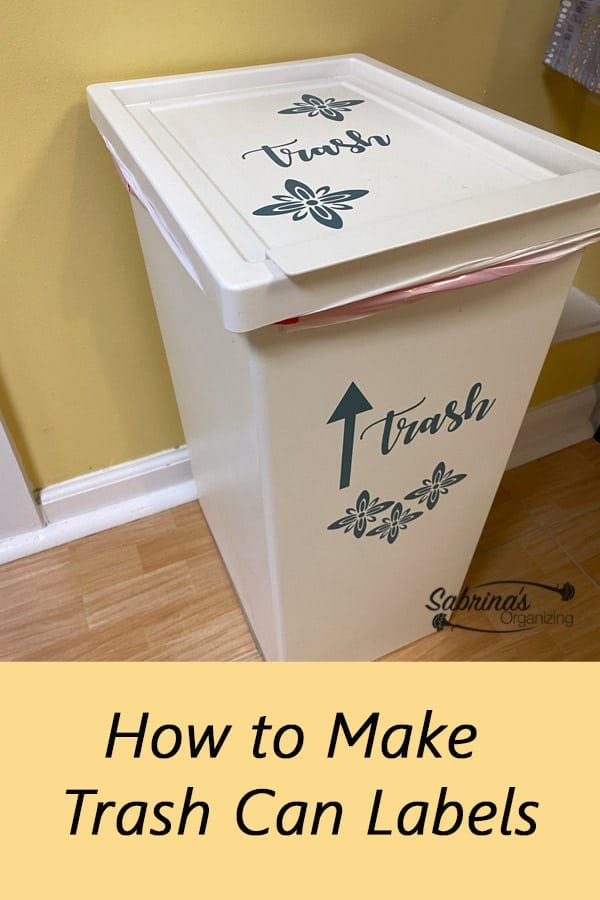
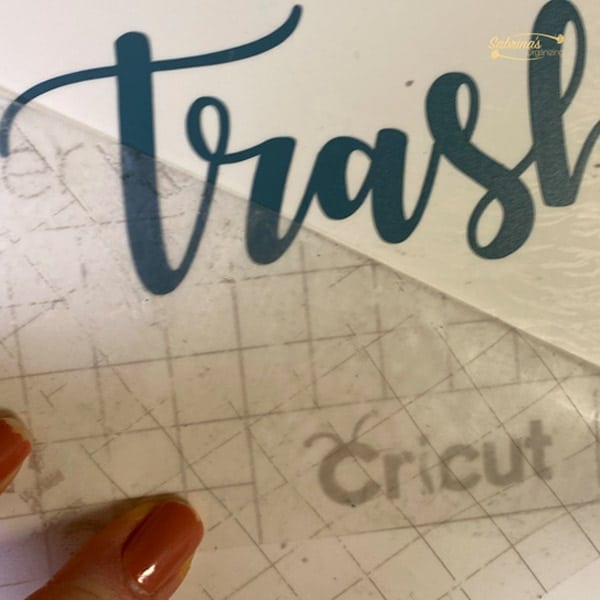
Transfer to the top and side of the trash can.

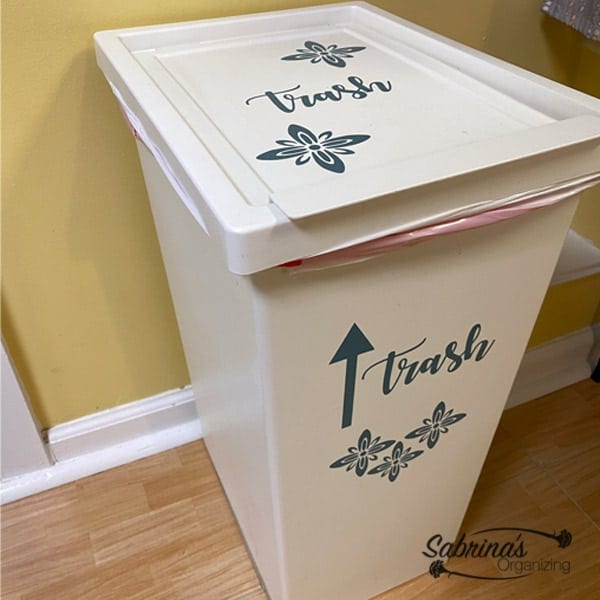
Now add the transferred vinyl to the top and front side of the trash can. See my two images below. Keep in mind that you can place them wherever you want. Press down after you slide off the transfer tape. If the letters are raised, press them down while removing the transfer tape.

Transfer the letters on the transfer paper to the trash can

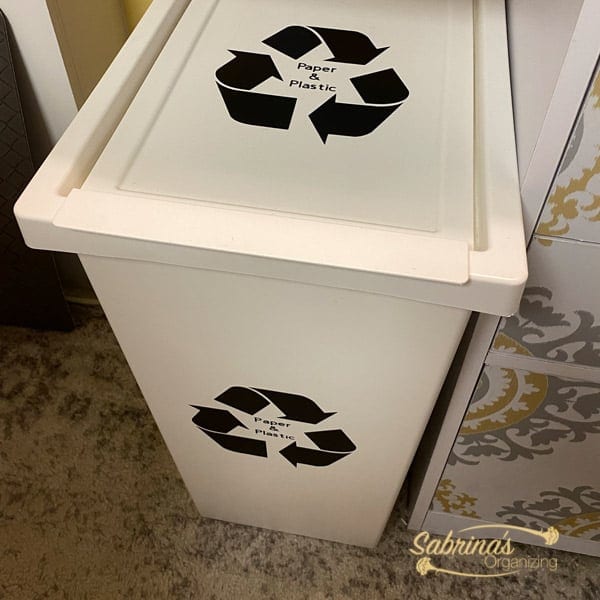
And that is it! What do you think of my pretty and practical trash can and recycling bin? Would you try this at home?

Below is the recycling bin. We can bulk recycle so I labeled it Paper and Plastic.

Recycling bin with labels

I wanted the trash can to look pretty, so I added flowers.

Trash bin with flowers and arrow

Keeping your trash organized will help you stay on top of the trash in your home. Remember: when you don't see a trash can, you probably will not throw things away.

How to make trash can labels - square image
How to make trash can labels - long image
(Visited 1,065 times, 8 visits today)

More Kitchen Organization Tips

  • What to Keep in Your Organized Pantry - square image
    What to Keep In Your Organized Pantry
  • The Best way to make drawers more functional | Sabrina's Organizing #kitchen
    The Best Way to Make Drawers More Functional
  • a kitchen with brown cabinets and food on the counter with the title overlay at the top right corner of square image
    7 Ways to Bring Usability Back to Your Kitchen
  • DIY Family Command Center Layout Idea - square image
    DIY Family Command Center Layout Idea

About Sabrina Quairoli

I love sharing my passion for organizing life and home. I hope you get inspired when visiting my home organizing tips, quick weeknight recipes, party planning ideas, and DIY organizing projects. Visit the About Me page to read my story.

Leave a Reply Cancel reply

Your email address will not be published. Required fields are marked *

This site uses Akismet to reduce spam. Learn how your comment data is processed.

Sabrina owner of Sabrina's Organizing and Admin Services

Hey, I'm Sabrina!

Thanks for stopping by and checking out my blog, where you can find Home Organizing, Quick Weeknight Recipes, and DIY Craft Home Organizing Projects. Feel free to browse around to get motivated to improve your home life!

Learn More
Sabrina Morresi Quairoli Received the NAPO Certificate of Study for Essentials of Productivity - digital badge
Sabrina's Organizing Supporting individuals since 1997 BANNER 25 year banner
Ready to Streamline Your Home - Get this year's Declutter Challenge ebook for Free long image

Recent Posts

  • a before and after image square - with the title at the top right and the before image at the top left - and the after image at the bottom -
    Bench Makeover Idea - DIY Project - Step by Step Instructions
  • How to Start Downsizing Your Life
    How to Start Downsizing Your Life
  • 4 Important Benefits of Living in a Small Home - square image
    4 Important Benefits of Living in a Small Home
  • 10 ways a father helped his daughter be organized and self-employed - by Sabrina's Organizing Blog
    10 Wonderful Ways A Father Helped His Daughter

Popular Posts

  • Yummy Curry Chicken Salad Recipe
  • Places To Donate Jewelry You Do Not Want
  • The Ultimate Cruise Packing List Everyone Needs
  • 43 Positive Mantra Sayings to Keep You on the…
  • This Year's Recycling and Shredder Events
  • 13 Ways to Make Your Bedroom An Oasis
  • Incredibly Easy Tips for Organizing An Older Adult's Home
  • Welcome to Sabrina's Organizing
  • 7 Book Storage Solutions For Small Spaces
  • Powerful Professional Organizer Advise For New Organizers
Get your free copy of our Home Management binder ebook
Get our Holiday Season Planner to help you save money and time with free checklists and Printables to make this season amazing

Amazon Disclosure


Sabrina's Organizing blog is a participant in the Amazon Services LLC Associates Program, an affiliate advertising program designed to provide a means for sites to earn advertising fees by advertising and linking to Amazon.com.

Sabrina’s Organizing Web Stories

Click on this badge to learn about what this badge means on NAPO.net

Sabrina's Organizing & Admin Services Registered & Insured through 2025

Footer

↑ back to top

About

  • About Me
  • Privacy Policy
  • Disclosure Policy and Cookies
  • Google Analytics Privacy Statement and Opt-Out Option
Sabrina's Organizing Supporting individuals since 1997 BANNER 25 year banner

Newsletter and Certifications

  • Sign Up for emails and updates
  • 2024 NAPO Business Stamp of Approval
Sabrina Morresi-Quairoli received Essentials of Productivity Certificate of Study from NAPO.

Contact

  • Contact
  • Solution Consultations
  • Virtual Organizing Consults
  • Write for Us
Productivity and Organizing Blog Carnival Ultimate Star Blogger Member
Sabrina's Organizing,  Sabrina's Admin Services, Organizing on a Dime, and Recipes to Chew On blogs by Sabrina Morresi-Quairoli is licensed under CC BY-NC-ND 4.0

As an Amazon Associate, I earn from qualifying purchases.

Copyright © 2011-2025. Sabrina's Organizing Blog content by Sabrina Morresi-Quairoli is licensed. Based on work at Sabrina’s Organizing blog, social media content, and newsletters shared, permissions beyond the scope of this license may be available when contacting me.

Manage Consent
To provide the best experiences, we use technologies like cookies to store and/or access device information. Consenting to these technologies will allow us to process data such as browsing behavior or unique IDs on this site. Not consenting or withdrawing consent, may adversely affect certain features and functions.
Functional Always active
The technical storage or access is strictly necessary for the legitimate purpose of enabling the use of a specific service explicitly requested by the subscriber or user, or for the sole purpose of carrying out the transmission of a communication over an electronic communications network.
Preferences
The technical storage or access is necessary for the legitimate purpose of storing preferences that are not requested by the subscriber or user.
Statistics
The technical storage or access that is used exclusively for statistical purposes. The technical storage or access that is used exclusively for anonymous statistical purposes. Without a subpoena, voluntary compliance on the part of your Internet Service Provider, or additional records from a third party, information stored or retrieved for this purpose alone cannot usually be used to identify you.
Marketing
The technical storage or access is required to create user profiles to send advertising, or to track the user on a website or across several websites for similar marketing purposes.
Manage options Manage services Manage {vendor_count} vendors Read more about these purposes
View preferences
{title} {title} {title}