****Visit our "Disclosure Policy and Cookies" for details. Affiliate links appear on this page from Google Adsense, Amazon, Order Out of Chaos, Impact affiliate members, Release, Repurpose, Reorganize, and Shareasale affiliate members.****
I had to revamp our garden this year, so I decided this would be a great opportunity to share the process if you are interested in organizing your raised bed garden.
We have done a vegetable garden for years now. It had been a relaxing and enjoyable experience for us. The kids don't really help, but they enjoy the food that is produced from our family garden.
Jump to:

Before Raised Bed Garden
It is not a big garden, as you can see, but it produces a lot of food throughout the season. We only have a space for a 4-foot by 4-foot area. Here is the before picture.

Easy Vegetables to use for the Garden
I first made a list of the plants I wanted in the garden. From past experience, these were easy to grow and maintain:
- Swiss Chard
- Spearmint
- Romaine Lettuce
- Banana Peppers
- String Beans
Because it was early in the season, I was able to find these veggies too. I am so excited to see how they turn out.
- Broccolini - I have no clue how this one will grow. We shall see.
- Kale
- Sweet Peppers
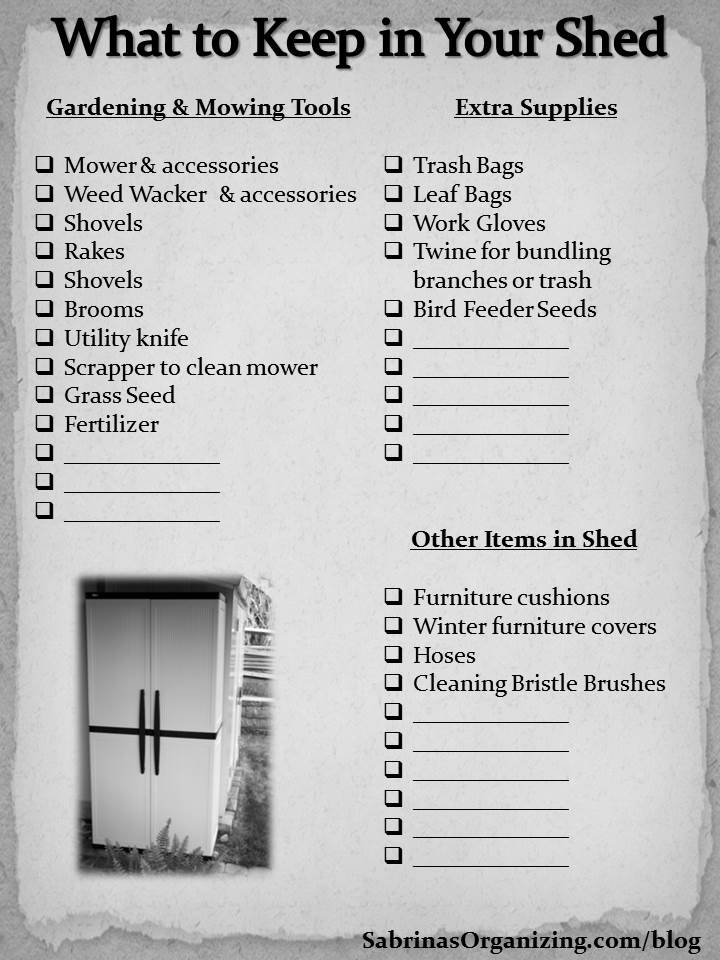
Supplies for the Raised Bed Garden
I rather buy plants at a garden center that are ready to plant than grow from seeds. I did it a few years when I started, but it really didn't work for me.
Then, we purchased 19 bags of 1 cubic foot of soil. Why did I purchase that many small bags, you may be wondering?
- The gardening kit needed 19 cubic feet of soil for the entire unit. And we used every last one of them.
- The local gardening store was running a really good deal on this site. It was even cheaper than the Wholesale store I go to.
- The bags were easier to manage. The large two cubic-foot bags are really hard and heavy to carry.

This is the kit we purchased from Amazon. Greenes 4 Ft. X 4 Ft. X 21 In. Tiered Cedar Raised Garden Bed![]()


How to assemble this raised bed garden
It was such a great day on Saturday that we started the project.

First, we took apart the old garden. It was quite easy since the older one was falling apart.
Free Shipping and Free 60 Days Returns

Then, we added the soil for the entire first layer.
We need to fill the entire area with dirt before moving to the next level. We used thick liners to help keep weeds out. We cut it larger so as to overlay the sides. Then, we stapled it around the sides of the unit.

Run the soaker hose
Before moving on to the next level, we needed to run the soaker hose under the unit. We figured that the bottom would be where we cap the end to allow for gravity to help the water move. So, we capped the end and then ran the hose under the second-level wood before filling in the second level. Then we did the same thing for the third level before filling it with soil.

Fill in with dirt
After we finished all the laying of the hoses, filing in the dirt, and then capping the end of the hose with an adapter for the actual hose, we cut around the edge of the levels to remove any excess liner. An Exacto knife worked best to do this. We had some extra layers that needed to be cut back, so we used scissors for the corners. We then added the corners by screwing in the caps. That is it.
After Raised Bed Garden.
And here is the final picture. I loved it, and I am going to enjoy all the vegetables to come.

Note: The baskets hold our cherry and plum tomato plants. This is the first time I am using our vertical planters that I created last summer, so we will see how it works. I shared it on HomeTalk.com. Here is the link if you want to check out how I made it.
All in all, we are really pleased with the outcome and hope the garden survives for many years.

Here is the before and after photo of organizing the raised bed garden:

Visit our other Outdoor Organization Posts to help you get your yard organized!
Do you have a garden? What plants do you like to grow in your garden? Please leave a comment below. I would love to hear from you.


Janet Barclay
When we first moved from our house to our apartment, we had a pretty big balcony garden. Then one year we couldn't use our balconies because they were doing repairs. Since then, I've had a hard time getting back into the swing of things, but your post is giving me a bit of motivation to get back to it.
Cheryl
Very nicely done! I just finished moving to a new house and I am not entirely sure just what might grow directly in the ground. I may be looking at a system like you have created. Thanks for the great ideas here!
Pamela Chollet
Sabrina, that looks terrific! Not only have you increased the space for planting, aesthetically it is so much more appealing. The garden will be gorgeous once it starts growing. What a great family project. You really don't need a huge back yard to garden. Post pictures as it grows.
Jacqueline Gum
This is so cool! Back when I did quite a bit of gardening, the idea of a raised garden never occurred to me. I love the way this looks and it is so efficient!
andleeb
Hello Sabrina
This was something new for me that you have to buy soil. I never thought that it is sold, as never experienced such condition in my part. But I must say that , you have done a great job. I love to grow vegetables and during my holidays, I will try to grow the vegetables on raised beds.
Thank you for share and great idea.
Erica
I'm all with you on buying the smaller bags of soil if they are easier to carry. And the fact that you got a better price than if purchased otherwise is just a bonus! It sounds like you've got an exciting garden in the works! I hope you all enjoy eating the fruits of your labor!
Ken Dowell
A timely post. We usually plant things up off the ground because of our dog, even though he mostly hates vegetables. I can certainly appreciate the smaller bags of soil. This weekend I hauled around 22 of the 2 cubic foot bags of mulch for our yard.
Meredith @ The Palette Muse
This is so timely! I'm just getting ready to do the same thing in our backyard. Last year we tried a little garden about the size of your first one and it just made us want to do more this year. Thanks for the inspiration!
William Rusho
What a nice little garden. I look forward to the future reports of your plants. I still have couple weeks before I can do any gardening, but you have given me some ideas for mine.
Marquita Herald
What a wonderful post Sabrina! I live at the top of a hill and my house is above a carport so I don't have a yard to plant a garden, but I captured a copy of your post anyway because I you've given me some ideas how I might be able to do a version of this on my deck! 🙂
Sabrina
Hi Marguita, I am glad this post gave you ideas. That is my goal for my posts. 🙂
Donna Janke
That is a very attractive raised bed. Well done. I've always liked raised beds but never had one myself. After moving this past summer into a bungalow condo, my gardening will be limited to small flower beds around the house. Good luck with your vegetables.
Sabrina
Thanks Donna!
Beth Niebuhr
what a nice project. There's nothing like home garden grown food! I hope you get a lot of good eating from yours.
Sabrina
Thanks Beth!
Lenie
Sabrina, I really like your 3 tier raised garden. I have been using raised gardens for quite a few years now but I do like this plan. I also like the hanging basket idea but since I don't have a covered patio not something I can use (wish I could). We can't put any plants out until the May holiday weekend and even then we still have to watch for frost. Lucky you that you can get started now.
Sabrina
Thanks Lenie, In my area, if I do not start the beginning of April, all the plants are gone. It's been three days and it looks like they are doing well. Crossing my figures. =-)