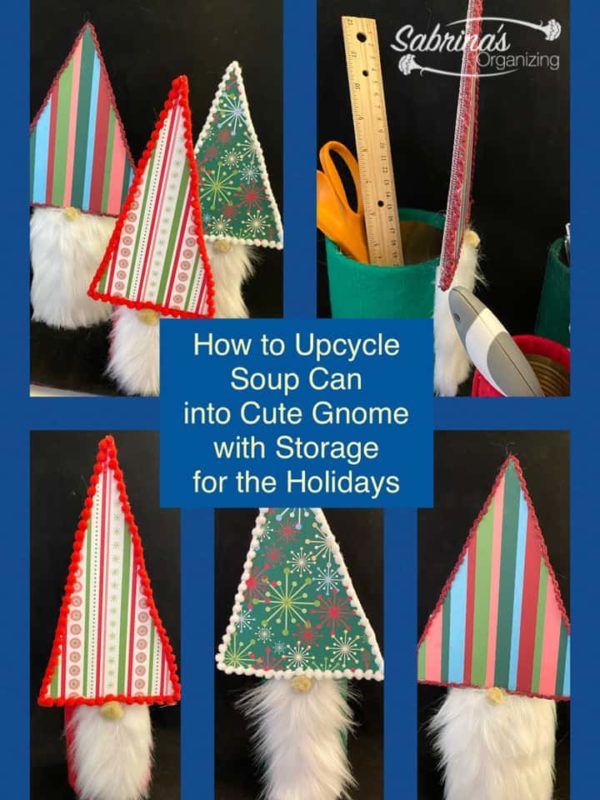
Holiday decorations can create clutter in a home. This DIY gnome craft project helps do three things this holiday season. First, I wanted this project to upcycle something rather than buy something new. Second, I wanted to create a storage area that can be used instead of just being a holiday home decor (affiliate). Lastly, I wanted it to look like the adorable gnomes I have seen everywhere. I was thrilled to have accomplished all these goals in this cute gnome holiday decor project. Follow along and see the steps on how I made this adorable gnome.
In recent years, these gnomes have gained popularity in homes, especially during the holiday season. However, they have also been designed and displayed for other holidays, such as Thanksgiving and Easter.
Jump to:
- What is a gnome?
- What can you do with an upcycled soup can to create a cute gnome craft project?
- How long did it take to make this gnome craft project?
- How to make cute gnomes with repurposed soup cans?
- Tips when making the gnome body.
- Now, make the beard for the gnome.
- Tips when making the beard for the gnomes.
- Lastly, attach the hat and beard to the can.
- Tips when attaching the hat and beard to the can.
- How much did it cost to make these three gnomes?
- The big reveal
What is a gnome?
If you wonder what a gnome is, it is a European folklore creature, often depicted as a goblin or an underground earth spirit, that protects treasures hidden in the earth. For more information about their history, visit this post on the "Love to Know" website.
What can you do with an upcycled soup can to create a cute gnome craft project?
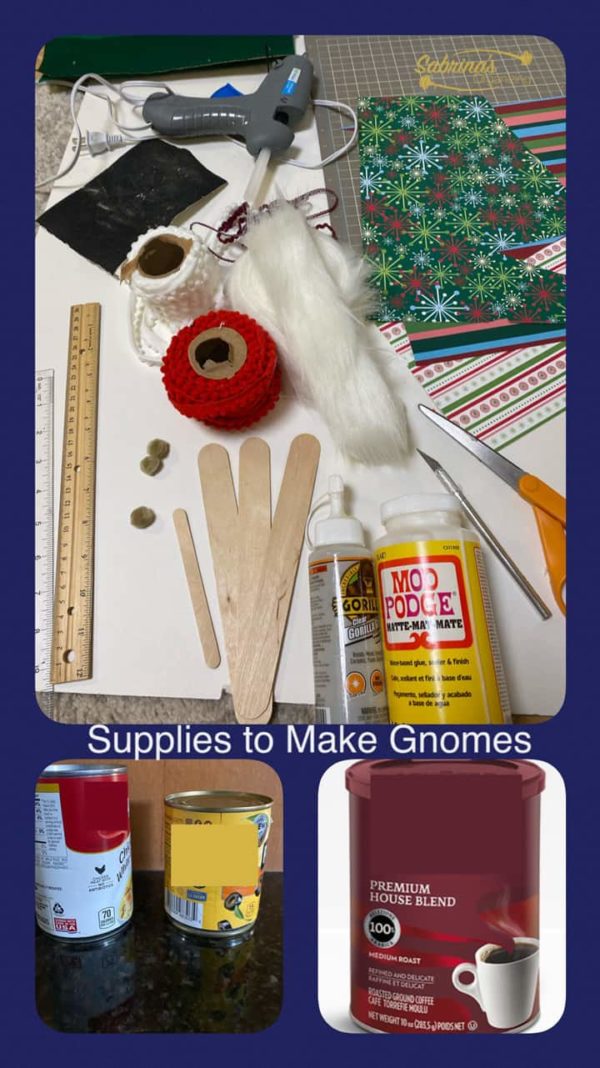
Below is a list of all the supplies I used to make these gnomes:
12 oz soup can - remove label (affiliate), clean can, and dry.
Black (affiliate) olive can - small - remove the label (affiliate), clean the can, and dry.
22-inch ribbon ¼ inch wide white
Form core board - cut into three triangles
Glue gun (affiliate)
Glue gun (affiliate) sticks
Green felt
3 - large (affiliate) popsicle stick
Mod Podge (affiliate) matt finish
Gorilla Glue (affiliate)
3 - ½ inch diameter cotton balls in beige
2 - rulers
12 oz. Coffee (affiliate) can - metal - clean can and dry. If there is a label (affiliate) on it, remove the label (affiliate) and glue.
18-inch ribbon ¼ inch wide red
2 - 22-inch ribbon ¼ inch wide burgundy
Scissors (affiliate)
Peel and stick felt - red
Peel and stick felt - green
Emery (affiliate) fabric
1 - regular popsicle stick
Sponge brush (affiliate)
3 - Christmas Card Stock Paper thick
Exacto knife (affiliate) and roller cutter
4 strips of gnome hair fur
How long did it take to make this gnome craft project?
This project required a significant amount of drying time that needed to be factored in. From gluing the popsicle stick to the foam core board triangles to hot gluing and wrapping the cans, the entire project started on a Friday and ended on a Sunday. A total of 6 hours + drying time overnight for two nights. There wasn't a lot of downtime because I could work on other aspects of the project while the items were drying.
Now that I had all these items together, I started the project.
How to make cute gnomes with repurposed soup cans?
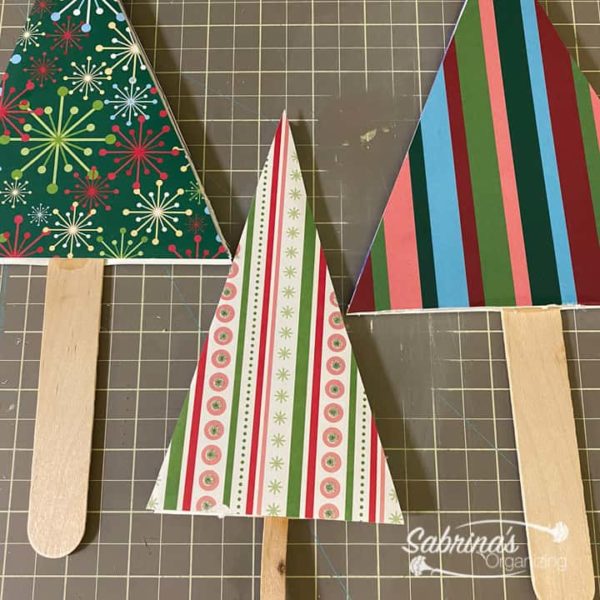
First, let's start with the foam core cutting. Below are the measurements I used for each of the different-sized cans.
First, make the gnome hats.
Visit the table below, which tells you the measurements of these gnomes.
| Olive can hat | The olive can is the smallest can. So, the triangle was the smallest. It measured 4 inches across the bottom and the sides measured 6 ½ inches. |
| Soup can hat | The soup can is the medium can. The triangle measures 5 inches across the bottom and the sides measure 7 inches. |
| Coffee (affiliate) can hat | The coffee (affiliate) can is the largest can. The triangle measures 6 inches across the bottom and the sides measure 8 inches. |
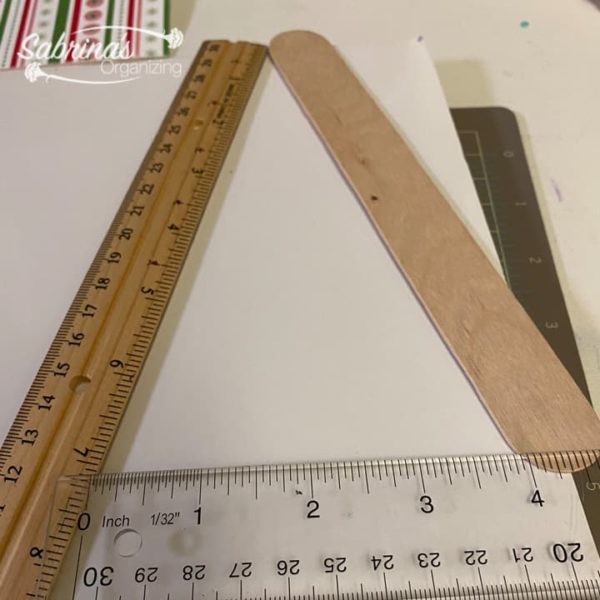
Measuring the triangles for the cans
After measuring each of the triangles above, I used an Exacto knife (affiliate) and a ruler to cut them out. I then used the edges of the already-cut triangles to make the additional ones.
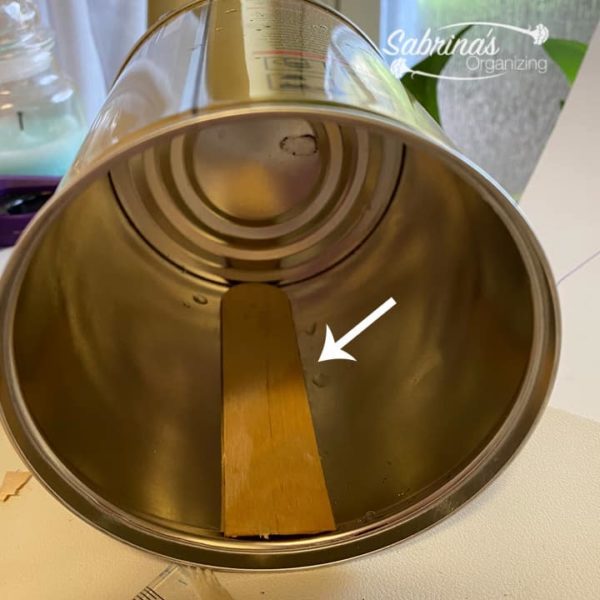
Since the coffee (affiliate) can had a lip, I added a cut piece of the large (affiliate) popsicle stick so that it made the surface of the inside flush with the lip. I used hot glue to adhere the popsicle stick to the inside.
Now, it was time to add the popsicle stick to the triangles. To do this, I used hot glue. I cut out the front and back of the triangle shapes on the cardstock, making sure they fit both sides, and set them aside.
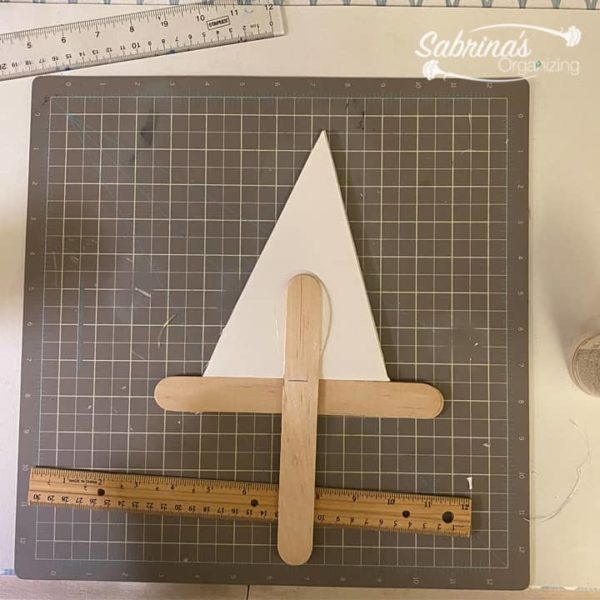
Adding the Popsicle Sticks
I took the large (affiliate) popsicle stick and marked where it matched the top edge of the can. This is where the hat will be sitting and where the nose and beard will begin. I cut the popsicle stick so that it lined up the triangle with the edge of the coffee (affiliate) can and the soup can. (See the mark on the image below.)
Now, it is time to add the popsicle sticks to the triangles. I used Gorilla Glue (affiliate) on the large (affiliate) popsicle stick and lined up the line I made with the bottom end of the triangle. And, I used two extra popsicle sticks to keep the stick I was gluing level with the foam core board triangle. I let it dry completely. I then did the same with the other two triangles.
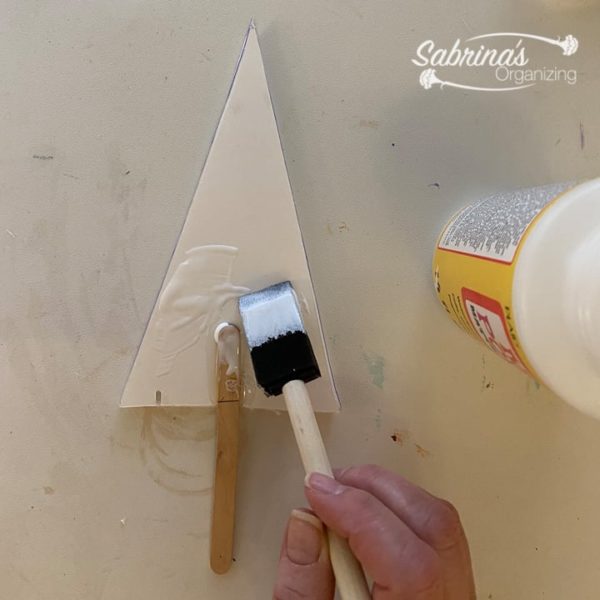
Add holiday card stock.
It was time to add the holiday cardstock triangles to the front and back of the triangles. Using Mod Podge (affiliate) and a sponge brush (affiliate), I added the card stock to all three-front and back. I used each triangle, traced it on the back, and cut out the cardstock.
Tip: when working from the back, make sure the pattern is going the direction you want it to show on the triangle.
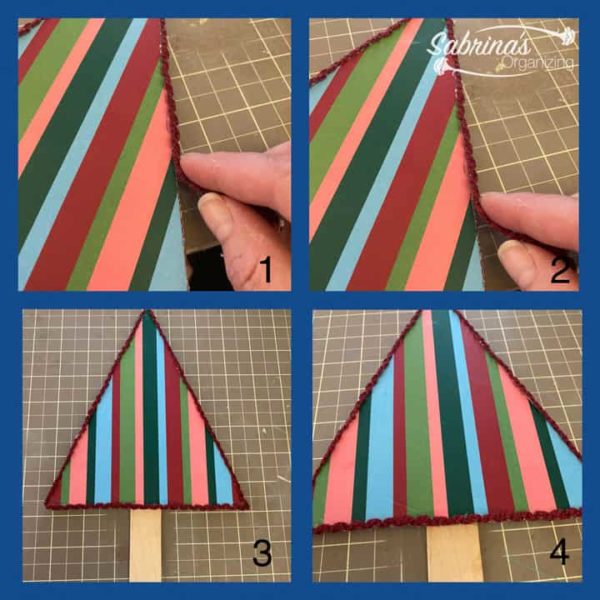
Add a Ribbon to the Triangles.
Now, it is time to cut and measure the ribbon. The red ribbon was 10 inches long. This is for the small olive can. Using the hot glue, I added the felt to the edges of the triangle. Continue around the triangle till it lines up to the other side. Cut off the excess.
The white ribbon measured 20 inches long. I then glued it to the green holiday cardstock triangles.
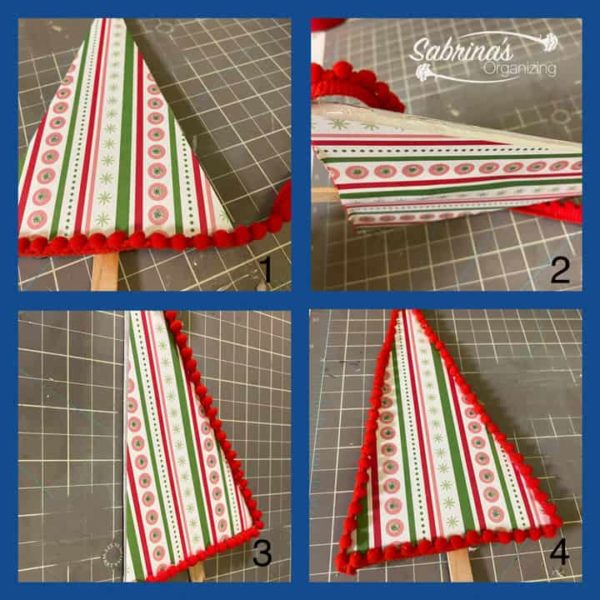
I did the same with the white ribbon and the two burgundy ribbons (affiliate). NOTE: the burgundy ribbons (affiliate) were a little thinner, so I added one to cover the foam core and glued the other one on the front edge so you could see it pop a little more forward than the foam core.
Tips when making gnome hats.
If there is any excess card stock after gluing to the triangles, use an Exacto knife (affiliate) and cut the excess paper before adding the ribbon.
Then, make the gnome body.
Now, it is time to turn to the body of the cans.
| Olive can gnome | 4 inches height by 9 inches long felt red - peel and stick |
| Soup can gnome | 6 inches height by 13 inches long felt green - peel and stick |
| Coffee (affiliate) can gnome | 8 inches height by 16 inches long felt green |
Since I used the peel-and-stick felt, I cut it down to size and ensured enough felt (about ½ inch or so) on top and bottom. Now, for the large (affiliate) coffee can, I used regular felt because of the size of the coffee can. Using hot glue, I added it to the can, pressed the green felt, and pressed it firmly around the can.
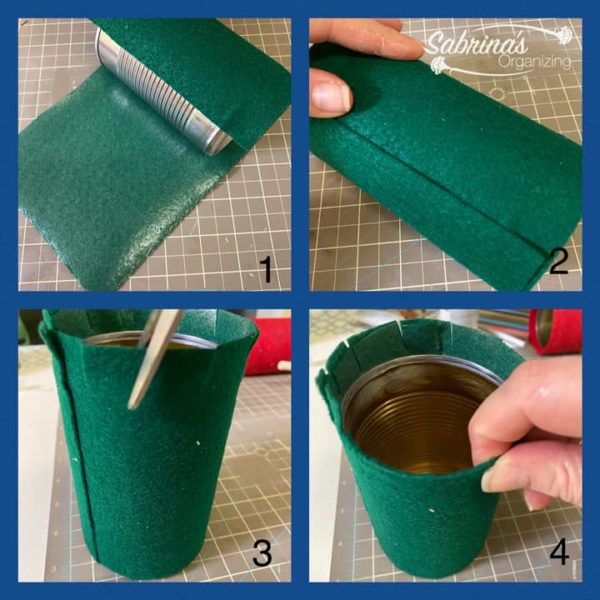
Now, to finish the ends! I used scissors (affiliate) to cut slices around the top and bottom of the can. Then, I glued the edges with the glue gun (affiliate). The peel-and-stick felt had a strong adhesive, so I only had to hot glue a few of the edges.
Tips when making the gnome body.
I tried a variety of glues. Hot glue was the quickest, but it was hot, and you needed to be careful, or you would be burned.
Now, make the beard for the gnome.
This beard had to be cut in a certain way. I needed to cut the back of the liner and remove some excess hair. It's a little messy and can get everywhere. I cut with the rotary cutter to remove the back of the gnome's hair.
Then, using my fingers, I gently moved the hair around to create the illusion of a beard.
| Olive can gnome | 3-inch-long piece of fur was 2 inches wide |
| Soup can gnome | 4.5 inches long, the piece of fur was 2 inches wide |
| Coffee can gnome | Two - 5-inch-long pieces of fur, both pieces are 2 inches long, so it was a total of 4 inches. |
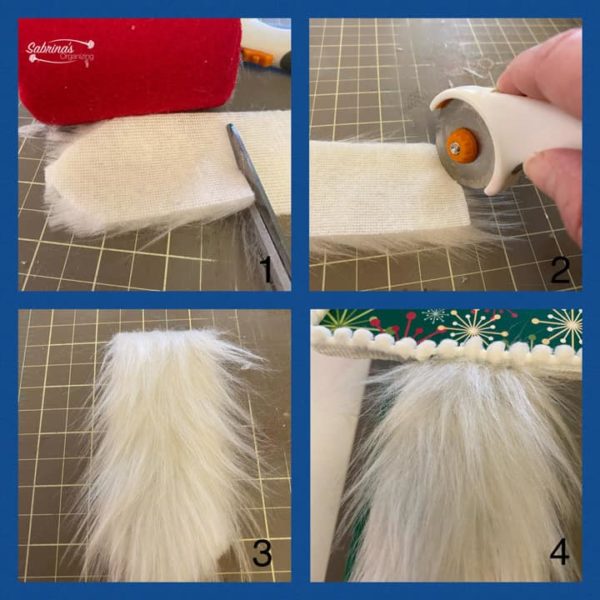
Tips when making the beard for the gnomes.
When cutting the backing, if you press too hard, you will cut the hairs and not just remove the backing.
Lastly, attach the hat and beard to the can.
First, we need to add the beard to the felt on the can. I added it to the side opposite the seam of the felt on the can. I did this to each of the three cans.
Using the hot glue gun (affiliate), glue the popsicle stick to the inside of the cans. If the popsicle sticks are too long, using the Exacto knife (affiliate), I cut the wood down so it can fit inside, and the triangle is close to the top of the can.
I added the cotton ball nose to the top of the beard with a dab of hot glue. And, I did this to all three fur beards attached to the can. I did the cotton ball nose last because I wanted it to be up against the triangle and the fur.
Tips when attaching the hat and beard to the can.
Have a fine-tip glue gun (affiliate) to help with more control over the glue.
How much did it cost to make these three gnomes?
It didn't cost much to make these three gnomes. I had the cans, foam core board, and card stock from my scrapbooking days, and the ribbons (affiliate) were all from prior projects. The felt was the most expensive thing, which cost three dollars each because they were a peel-and-stick type. Taking all of these into account it was about $5.00 for each can. A total of $15.00 for all three.
Feel free to watch the video on YouTube and Subscribe to our channel!
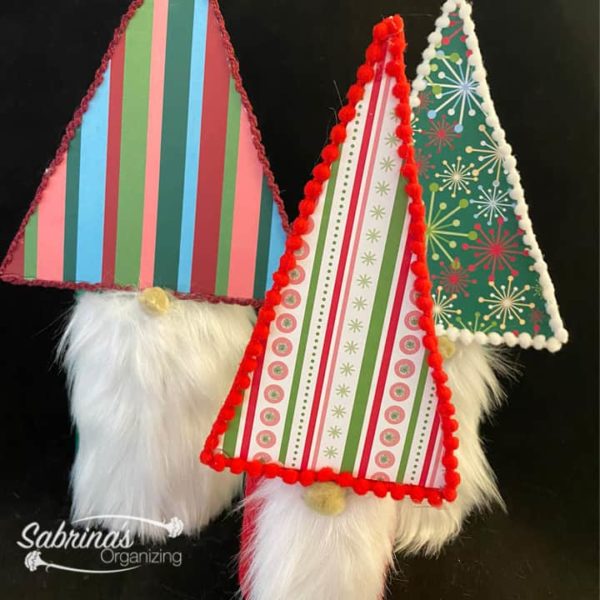
The big reveal
And here is the big reveal! What do you think? They turned out so cute. And I can use them to store supplies during the holidays. YAY! Below is a picture of the outside of the cans.

If you are looking for other upcycling and home DIY organizing projects, check out these posts below.
HOW TO MAKE A DESK ORGANIZER ON THE CHEAP
HOW TO CHANGE A PLAIN SOUP CAN INTO A GORGEOUS DIY PENCIL HOLDER
SOUP CAN TO DIY MAKEUP BRUSH HOLDER
Please note these are affiliate links through Amazon (affiliate), and at no additional cost to you, I will earn an affiliate commission if you click through and decide to make a purchase.