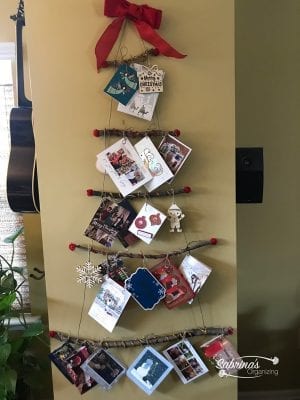
Over the years, I have seen many of these DIY Christmas Tree wall decor. Some are super delicate; others are more rustic. All will help you save space in a smaller home or apartment. Today, I am sharing the one I made for my smaller home. To save space, I created mine to hold my holiday greeting cards (affiliate), so it is a multitasker in our home and reduces the needed wall space. Let's begin.
Jump to:
Needed items to make a Christmas Tree Greeting Card Wall Decor:
- Five branches - 7.5 in. long branch, 12 in. long branch, 15 in. long branch, 23 in. long branch, and 23 in. long branch - each branch should be about ¾ in. in diameter.
- 10 Red Sparkly Cotton Balls- 1 inch in diameter
- 120 inches in length, gold (affiliate) wire-covered rope
- Seven pipe cleaners - 3 red, four gold (affiliate)
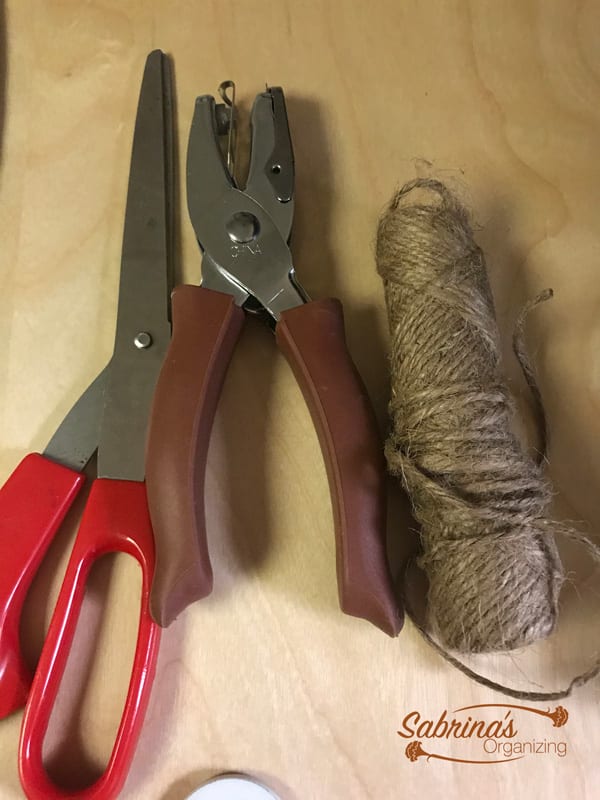
- One roll of Twine Rope
- Four flat wooden ornaments (affiliate)
- Make your own red bow, or buy one already made.
Check out Dollar Tree (affiliate) to find some items for this project at a low cost.
Tools needed for this DIY project:
- Saw (affiliate) to cut the wood
- A regular hole puncher
- Scissor
- Hot Glue (clear)
- Hot Glue gun (affiliate)
Instructions on how to make this Christmas Tree Greeting Card Wall Decor:
I first started cutting the wood branches to the length stated here: 7.5 in. long branch, 12 in. long branch, 15 in. long branch, 23 in. long branch, and 23 in. long branch - each branch should be about ¾ in. in diameter.
Then, I cut enough of the gold (affiliate) wire-covered rope to cover the length of both sides of the tree. I left space between the branches about the size of a greeting card. I then made a knot around each branch on each side. The wired rope was so stiff that it helped keep the shape of the tree. I went and added a dot or two of hot glue to each knot to keep it in place.
Then, I used the hot glue and added the red cotton ball to the end of each branch.

I added the bow to the top of the tree. I made it myself, or you can use a premade one.
Then, I added the pipe cleaner, starting with the yellow, and wrapped it around the branch. I then added hot glue to the end of each pipe cleaner. Use the yellow pipe cleaner, then the red pipe cleaner, and so on. Be sure to interlock the pipe cleaners when you need more than one for a branch.

I affixed the cards by using the hole puncher and punched a hole in the greeting card. I took the twine rope and cut it into strips of about 12 inches or less. Then, wrap it around the branch and make a bow. I hole-punched the corner of the card so it hung more vertically.
Then, I added the flat wooden ornaments (affiliate).

Visit our other DIY Christmas Decor!

Well, there you have it! Here is the finished product. What do you think? Would you make this to organize your holiday cards? I think I will use this every year from now on.
Reveal
I'm delighted with how this project came together. I like that the branches are unique and smooth enough to hold the cards in place. If you have any questions when doing this DIY project, feel free to leave a comment below, and I will get back to you as soon as possible.

Visit this post (15 CREATIVE HOLIDAY CARD ORGANIZATION IDEAS) or this other post I found on the internet to get inspiration about DIY Christmas Tree Greeting Card holders.
END OF HOLIDAY SEASON UPDATE:
Now that the season is over check out the Christmas Tree Greeting Card Wall Decor looks! It really filled in the spaces. Do you agree? I am so happy with it.