
Remodeling can be difficult for any homeowner, especially couples and singles. It's hard to dismantle the heart of your home and know where everything is and where it ends up after the work is done. This process involves planning and strategy to reduce stress during and after the process.
I helped a client declutter and organize before she remodeled her kitchen. These 11 tips came straight out of our three-hour session, and they still hold up years later. I've added updated tools (affiliate) and tricks at the end to make the process even easier in 2026.
Estimated reading time: 9 minutes
Jump to:
- Key Takeaways
- 1. Purge as you pack up the kitchen.
- 2. Group items and place them in the bags.
- 3. Stand small boxes on their side in the bag instead of laying them flat.
- 4. Sturdy-handled cloth grocery bags are your best friend.
- 5. Look for other areas of the home to store glasses.
- 6. Make a frequently used bag
- 7. Move Your Stuff in Stages
- 8. Take Artwork and Pictures Off the Wall and Store Them on Another Floor
- 9. Clean out and clear the pantry.
- 10. Get a Hotel Room
- 11. Get Help
- Updated Tips and Hacks for 2026
- Kitchen Remodel Project Tips Part 2 - Kitchen Remodel Tips Before & During
- Kitchen Remodel Project Tips Part 3: How to Eat Healthy Without a Kitchen
- Label boxes by destination room, not just contents.
- FAQs
- Conclusion
Key Takeaways
- Decluttering and organizing simplifies the remodeling process for homeowners, reducing stress.
- Key (affiliate) tips include purging items before packing, grouping similar items, and using durable bags.
- Setting up a temporary kitchen helps maintain functionality during the remodel.
- Photographing items and using inventory apps enhances organization and tracking.
- Labeling boxes (affiliate) by destination room streamlines the unpacking process after the remodel.
1. Purge as you pack up the kitchen.
Don't just throw everything in bags. Be mindful of what you place in the bag. Ask yourself, "Will I use these items after the remodel?" If the honest answer is no, this is your chance to let it go before it gets packed up, moved twice, and unpacked right back into the same drawer.
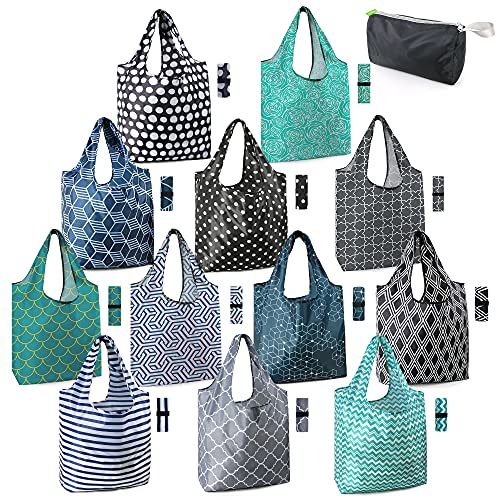
Reusable Grocery Bags Lightweight Durable Shopping Bags Washable Foldable 12 Pack Xlarge
Buy Now →
Reusable Grocery Bags, Heavy Duty Shopping Tote Bag
Buy Now →(affiliate)
2. Group items and place them in the bags.
Try to have all the like items in each bag. Grouping by category- baking, everyday dishes, small appliances (affiliate), spices - makes unpacking after the remodel so much faster, because you're not hunting through ten random bags for one mixing bowl (affiliate).
3. Stand small boxes on their side in the bag instead of laying them flat.
This lets you easily see the contents by moving the top layer, instead of digging to the bottom of the bag.
4. Sturdy-handled cloth grocery bags are your best friend.
The cloth grocery bags you probably throw around the car and pantry (affiliate) work perfectly. You probably have plenty of them in your cars. They're sturdy, they stack well, and you don't have to worry about a paper bag giving out on you mid-move.
5. Look for other areas of the home to store glasses.
I found that glasses are hard to store in bags, so a flat, sturdy surface or a cabinet works well. We used the tops of a dresser in a guest bedroom (affiliate) to store everyday glasses.
6. Make a frequently used bag
Another task before a kitchen remodel is to create a frequently used bag (or bags) for stuff you will use during the remodeling process. This could be vitamins, paperwork, coffee (affiliate) maker supplies, canned foods, etc. Be sure to pack a can opener in that bag; it's easy to forget and hard to live without.
7. Move Your Stuff in Stages
Move your stuff from the kitchen to an adjacent room, then move it to another floor. This may sound like a waste of time, but it really does save time and your back. Here's how we did it. First, we bagged up everything and moved it to the adjacent room. Then, when we were done. She went upstairs, and I brought her two bags at a time. She then placed them in the bedroom (affiliate). Easy peasy.
8. Take Artwork and Pictures Off the Wall and Store Them on Another Floor
This is a great time to assess your artwork and decide whether you want to keep it or reuse it in another room. You can even sort them differently. Visit our post "How to Arrange Photos" for more tips on arranging photo options.
9. Clean out and clear the pantry.
You may not have access to your pantry (affiliate) during the remodel, so clearing it out now will make your life a lot easier. It's a great opportunity to dig out the back of your pantry (affiliate) and use up anything that's about to expire. If items have boxes (affiliate) with labels (affiliate), stand them up so you can see the labels (affiliate) at a glance.
10. Get a Hotel Room
Don't want to hear the noise or see the mess? Book a nearby hotel suite or short-term rental. A kitchenette can save you money, especially if you already have food to use up from your pantry (affiliate) purge.
11. Get Help
Get help! Don't be shy to ask for it. The more hands, the easier, less stressful, and quicker the project will be. Invite people over and give them pizza and beer as a "thank you."
By taking time to plan where everything will go and what you'll do before a kitchen remodel, you will feel more relaxed through the transformation and relieved that you took these initial steps.
Updated Tips and Hacks for 2026
A few things I now recommend that make kitchen remodel prep even smoother:
Photograph your pantry and cabinets before you pack.
A quick series of photos on your phone gives you an instant inventory; handy for insurance purposes, and even handier when you're standing in the store trying to remember if you already have three cans of diced tomatoes. This only works if you keep the same layout. But you'll usually want to change it up in a newly designed kitchen.
Use a home inventory or labeling app instead of just a Sharpie.
Apps like Sortly or Nest Egg let you snap a photo of each bag or box, add a label (affiliate) and location, and generate a QR code sticker so you (or anyone helping you) can scan a box and instantly know what's inside without opening it.

Kitchen Remodel Project Tips Part 2 - Kitchen Remodel Tips Before & During
I found out the kitchen demo starts in two weeks. If you read my previous post, we started planning the kitchen remodel project about six months ago. Since the weather was so bad this past winter, the start of the process was delayed a bit, too. But that was OK.
Set up a real temporary kitchen, not just a card table.
A folding (affiliate) table with a microwave, electric kettle, mini fridge, and a slow cooker (affiliate) or portable (affiliate) induction burner can cover most meals for weeks. Garages, basements, and even a corner of the dining room all work as a temporary kitchen zone.

Kitchen Remodel Project Tips Part 3: How to Eat Healthy Without a Kitchen
My previous two posts were about kitchen remodel tips. In this post, I will discuss how we ate healthily during the remodel. I like to make sure we all eat healthily. I also like everyone not to eat too much.
Plan for the real timeline.
Most kitchen remodels now run about 6 to 8 weeks from demo to done, longer if you're waiting on custom cabinets or there are supply delays. Pack your frequently used bag and set up your temporary kitchen, assuming you'll need it for the long haul; it's much easier to be pleasantly surprised by an early finish than caught off guard by a delayed one.
Lean on grocery delivery and meal kits during the chaos.
Between takeout fatigue and a kitchen full of boxes (affiliate), a few weeks of grocery delivery or a meal kit service can take one more decision off your plate while you're living out of a bag.
Use clear bins for fragile or frequently needed items.
Cloth grocery bags are still great for most things, but stackable clear bins with lids protect glassware and dishes better during a longer remodel and let you see the contents without unpacking.
Donate as you purge; don't just stockpile a "maybe" pile.
Take a photo of anything you're unsure about and post it to a local Buy Nothing group or donation app the same day you pack it, instead of letting a "donate later" bag sit in the garage (affiliate) for six months.
Label boxes by destination room, not just contents.
If you're moving items to multiple rooms or floors, note both what's inside and where it's headed. It saves you from playing twenty questions with whoever is helping you carry things. You can buy prewritten moving labels (affiliate) or print QR codes with each destination room's label (affiliate).

Label Maker - P-touch CUBE Plus Bluetooth, white uses an APP
Buy Now →
Label Maker By Brother P-Touch, PTM95,
Buy Now →
QR Code Smart Labels for Moving| Color Coded Scannable Stickers
Buy Now →(affiliate)
FAQs
Start purging and packing about 1 to 2 weeks before demo day, so you're not rushing through decisions about what to keep. Doing it over a few sessions instead of one long weekend also makes the purging step easier, since you're less likely to just toss everything in a bag to get it over with.
Think about what you touch daily: vitamins and medications, a can opener, basic paperwork, coffee maker supplies, a few pots and utensils, and any shelf-stable foods you'll actually eat during the remodel. Keep this bag or bin somewhere easy to grab, like your temporary kitchen area, not packed away with everything else.
A flat, sturdy surface works better than a bag for glasses and dishes; think a dresser top, a closet shelf, or a stackable clear bin with a lid. Bags are great for sturdier, like-grouped items, but fragile pieces do best somewhere they won't get crushed or shifted around.
Not necessarily. Many homeowners stay put and set up a temporary kitchen in another room, but a hotel room or short-term rental with a kitchenette can be worth it if the noise, dust, or lack of running water becomes too stressful, especially for households with young kids or anyone sensitive to noise.
Most kitchen remodels take around 6 to 8 weeks from demo to completion, though custom cabinetry, permitting, or supply delays can extend that. Plan your temporary kitchen setup and frequently used bag with that longer timeline in mind so you're not caught off guard.
Packing without purging first. If you just dump everything into boxes without asking whether you'll use it again, you end up moving clutter twice and unpacking it right back into your brand-new kitchen. Take a few extra minutes per item-it's worth it.
Need help organizing your kitchen before your next remodel? Check out my virtual, task-based organizing sessions.
Conclusion
Visit the articles below for more information about decluttering and organizing before a kitchen remodel. The last three posts are from my very own experience remodeling my kitchen.
3 Tips to Organize Your Kitchen after a Remodel
Part 1 KITCHEN REMODEL PROJECT TIPS - ZONES TO ADD TO YOUR NEW KITCHEN
KITCHEN REMODEL PROJECT TIPS - HOW TO ORGANIZE THE KITCHEN STUFF BEFORE & DURING A KITCHEN REMODEL - [Part 2]
Part 3 KITCHEN REMODEL PROJECT TIPS - EATING HEALTHY TIPS WITHOUT A KITCHEN
Have you remodeled your kitchen? What tip would you add? Leave a comment below. I'd love to hear how it went for you.
Related Kitchen Posts:









Linda Samuels says
I've helped many clients to declutter their kitchens pre-renovation. They are always surprised how many things they don't way, use, or need...or how many duplicates or triplicates they have of things. We usually stage an alternate area that can be used as a temporary kitchen. The items that won't get used for months, we box up. And when it's time to unpack, post-renovation, usually more items are let go of. It's kind of like moving. We declutter pre-move and then do even more post-move. Organizing is a process. And often when we use the opportunities that change brings to re-evaluate, we decide find it easier to edit, let go, and make decisions.
Seana Turner says
I've lived through a kitchen remodel and it isn't easy. We turned the dining room into a "sort of" kitchen, with a microwave and hot plate. I agree that this is a good time to clear out the pantry and eat everything up. We ate out quite a bit during the remodel, but saved a few $$ by eating up our reserves first. A kitchen remodel is always rewarding in the end:)