Want to grow your own vegetables but not sure where to start? Planning a raised bed vegetable garden doesn't have to be complicated - but a little upfront organization makes a huge difference in how much food you actually harvest.
I've been backyard raised bed gardening since the early 2000s. Our property has clay soil and tons of roots, so in-ground gardening was a non-starter - nothing survived our first attempt. Over 20+ years of trial, error, and modifications, I've figured out what works (and what definitely doesn't).
In this post, I'll walk you through how I plan and set up my raised-bed vegetable garden each year, including the exact layout, the plants I chose, the supplies I used, and a full cost breakdown (about $200 total). I've also included before-and-after photos and a 3-month growth update to show real results.
Whether you're a first-time gardener or looking to get more organized with your existing raised beds, this step-by-step example will give you a clear roadmap to follow.
Full disclosure: This post contains affiliate links through Amazon (affiliate). At no additional cost to you, I will earn an affiliate commission if you click through and decide to make a purchase.
Jump to:
- Key Takeaways
- Areas to take into account when planning a vegetable garden
- Raised Bed Vegetable Garden Example
- What inspired me to do this? A Well-Organized Vegetable Garden
- What supplies and tools did I use to make this well-organized Vegetable Garden?
- How much did it cost to create this well-organized vegetable Garden?
- How long did it take to make Well Organized Vegetable Garden?
- Before
- How did I create this well-organized vegetable Garden?
- Frequently Asked Questions About Raised Bed Vegetable Gardens
- The Big Reveal
- 3 months later, the vegetable garden has grown
Key Takeaways
- Planning a Well Organized Vegetable Garden involves assessing sun exposure, companion planting, and site preparation.
- Use quality soil, compost, and tools (affiliate) to ensure the plants thrive in your raised bed garden.
- Create a clear layout for planting, accounting for spacing and growth patterns of each type of plant.
- Maintaining the garden requires planning, teamwork, and regular updates like watering and pruning to encourage growth.
- The estimated cost to set up a well-organized vegetable garden is around $200, which includes supplies and plants.
Areas to take into account when planning a vegetable garden
Let's start with the main areas to consider when developing a vegetable garden.
Planning and Design Fundamentals
It is crucial to plan, as it can quickly go awry, wasting a significant amount of money and time. When you determine the full sun exposure patterns in your backyard, decide which direction you want to place the garden. It is essential to review full sun exposure patterns throughout the day, not just in the morning or midday, to ensure optimal sun protection. If you have a southern exposure garden area, one that receives direct sunlight without many trees or buildings blocking it, you will have a great spot to plant your garden.
Companion Planting and Crop Rotation
There are different types of gardens, ranging from traditional in-ground gardens to raised beds, where you start from scratch above ground, and container pots on a patio, among many other options. Determining the square footage of your garden will help you decide how many plants you need. Be sure to visit the companion planting guide from the Farmer's Almanac site. It is a great site to determine where the plants should be placed and, most importantly, which plants should not be combined.
Site Selection and Preparation
The ideal location for the garden would be an area with 6-8 hours of daily sunlight, good drainage, and convenient access to water. Be sure to conduct a soil test to determine what your garden needs and what it does not. You can find soil test kits on Amazon, Home Depot, and Lowe's websites.
When creating a garden bed, if your soil is not suitable for growth (mine was not), you will need to take a few steps to prepare the area.
- Remove existing vegetation and grass completely. Frame out the area.
- Add the edging to protect the garden. Be sure to add chicken wire to protect your vegetables from bunnies, squirrels, etc...
- Loosen the soil and add/mix in compost or other organic matter to improve drainage and nutrient levels. Buy in-ground soil for in-ground garden beds and raised-bed soil for raised-bed gardens. They have different nutrients for different types of vegetable gardens.
- Then, lay down mulch to help retain moisture and suppress weeds. Visit my posts below for information on how I created this garden bed.
Layout and Spacing Strategies
On each label (affiliate) with your plant or seed pack, you will find information on plant spacing and the expected size of the plant. You can add smaller plants to the front of a bed that gets sun all day. And, add larger plants to the back so the smaller plants can grow and thrive. Growth patterns are also essential to check out.
You can do interplanting, which involves combining different plant types and sizes. Be very detailed when doing interplanting, since it may create issues for your plants. I like keeping my plants farther away from one another. They grow better that way in my garden. Here are some Gardening books on Amazon for more information.
Tools and Infrastructure
There are various tools (affiliate) available for your garden. It would be too lengthy to list here. Below are just some you may need.
Tools for Soil Prep
Below are tools (affiliate) for when you need to prep the soil.
- Shovel or Spade
- Garden Fork
- Rake
- Hoe
- Tiller
- Soil Test Kit
Tools For Planting
Below are the tools (affiliate) you need for planting your plants, whether it is from seeds or plants.
- Hand Trowel
- Gardening Gloves
Tools For Maintenance
Below are the tools (affiliate) you will need throughout your vegetable gardening journey.
- Pruning Shears
- Watering Can or Garden Hose with Nozzle
- Weeding Tools (affiliate)
- Stakes and Labels (affiliate)
- Wheelbarrow or Garden Cart
- Compost bin
- Insect net
- Fencing
Tools For Harvesting
And when your food is ready to harvest, it's time to use the tools below.
- Sharp Knife or Scissors (affiliate)
- Basket or Harvesting Container
This is a comprehensive list of items you will likely need, most of which you will require over time.
Raised Bed Vegetable Garden Example
I couldn't install in-ground gardens on my property because we have clay soil and lots of roots in the ground. Our first garden was in-ground, and nothing survived. To have good soil for the plants and maximize the quality of our own food, we decided to create garden beds.
An example is always helpful when starting to organize your very own vegetable garden. To illustrate how I created my garden, I've designed a well-organized vegetable Garden with an Example below, so you can see what I did.
What inspired me to do this? A Well-Organized Vegetable Garden
I come from a long line of gardeners. My grandmother in Italy had a farm and would raise chickens, rabbits, and vegetables. My mother would garden as well. She would make Italian ingredients that we would use in recipes. Some plants she grew were plum tomatoes, Italian peppers, Italian parsley, rosemary, sage, and many other things over the years when I was growing up.
I have been gardening at home for over 20 years and have tried many different types of garden vegetables. I keep a garden journal (affiliate) in my online notebook to remind me what worked and what didn't work. Some worked and others did not. Some grew but did not bear vegetables. And, over the years, I found that I would try different plants to see how they would work in my raised bed garden. Feel free to check out my posts, which share my garden updates and tips over the years.
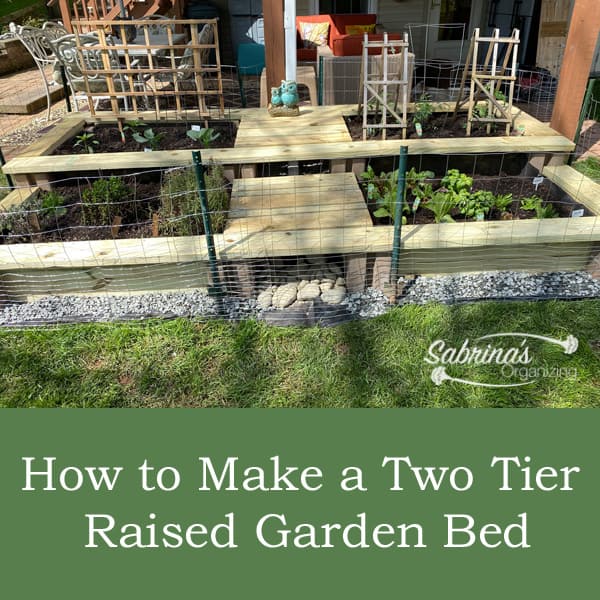
- HOW TO MAKE A TWO-TIER RAISED GARDEN BED - This one will show you how we made this garden with the garden plans included.
- FUN CHEAP AND EASY PRACTICAL OUTDOOR GARDENING IDEAS
- ORGANIZING RAISED BED GARDEN
What supplies and tools did I use to make this well-organized Vegetable Garden?
There is a variety of herbs (affiliate) that grew here previously. I subdivided the two different lists of supplies from each other.
Perennial Herbs (affiliate): Below are the plants that grew back this year.
- Lemon Balm
- Sage
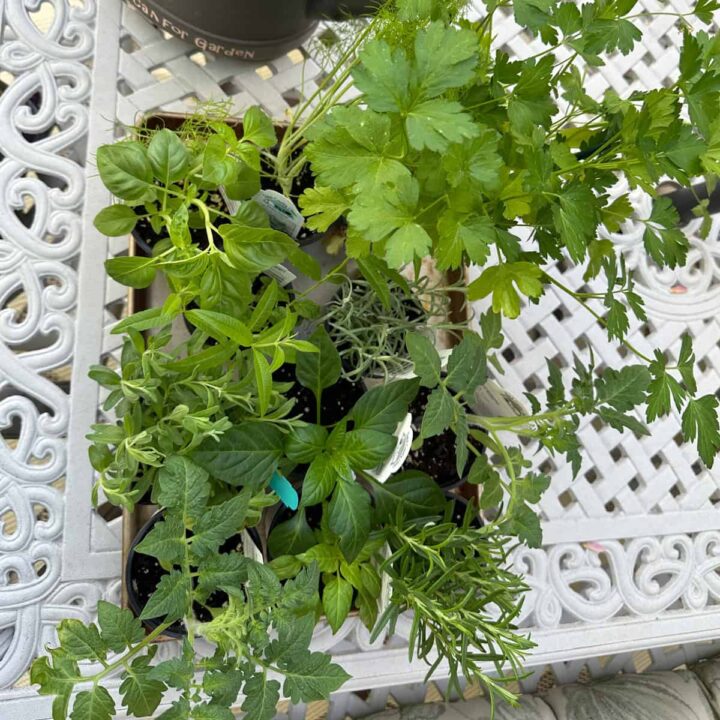
Annual Plants and Herbs (affiliate): These plants are the ones I planted this year. I purchased these plants from Ott's Garden Center in Pennsylvania. (I did not grow them from seed.)
- Parsley
- Basil
- Spearmint
- Curry plant
- Fennel
- Italian Peppers
- Pepperoncini
- 2 Plum tomato plants
Supplies used:
- 4 extra-large (affiliate) bags of Miracle-Gro Raised Bed Soil (affiliate)
- Sprinkler (affiliate) and hose 75 foot version (affiliate) or you may use an irrigation system
- Orbit B-Hyve app and timer (affiliate)
- Water pitcher (optional)
- 12 packs of plants support stakes (Outdoor), plant support with garden wire(affiliate) from Amazon (affiliate) (affiliate)
- Tags to label (affiliate) the plants
Full disclosure: these are affiliate links through Amazon (affiliate). At no additional cost to you, I will earn an affiliate commission if you decide to make a purchase.
How much did it cost to create this well-organized vegetable Garden?
The total cost was approximately $200 to purchase the plants, soil, and other miscellaneous items.
How long did it take to make Well Organized Vegetable Garden?
It took me about two hours to set up the garden for this year.
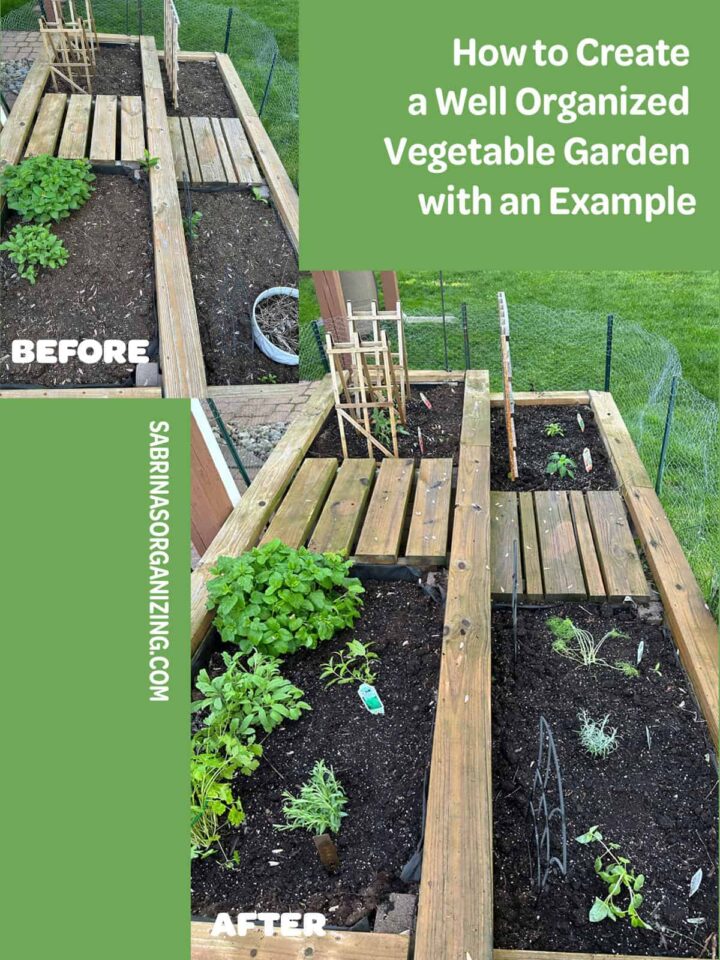
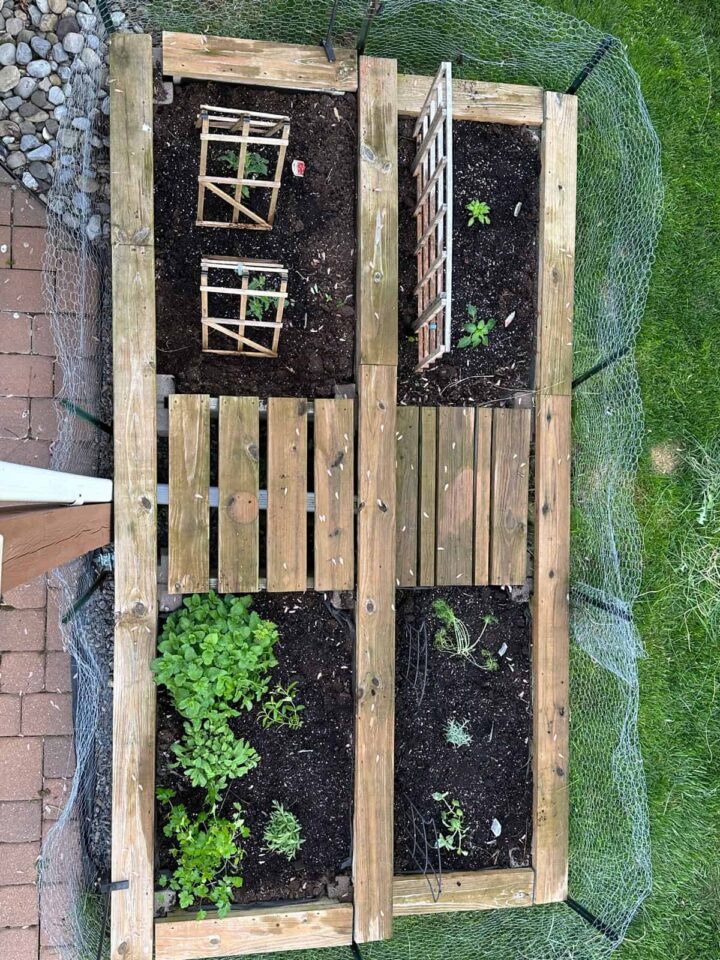
Before
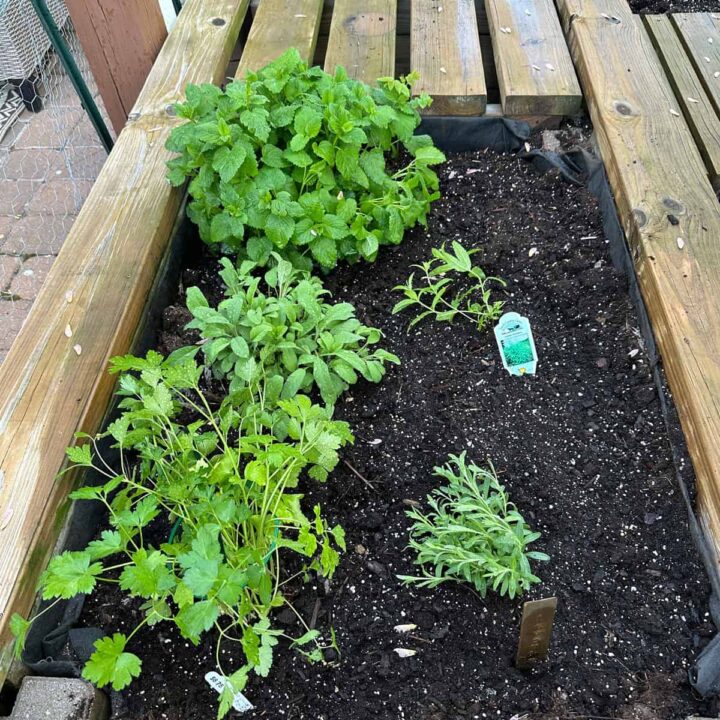
Here is what the garden looked like this year, before I planted anything. As you can see, I had only lemon balm and sage plants left from last year. Everything else needed to be replaced. Even the spearmint died this year due to the excessive rain and snow we have been experiencing.
How did I create this well-organized vegetable Garden?
First, I added Miracle-Gro raised bed soil(affiliate) to each section of my own garden. I ensured that I mixed several layers of the existing soil surface with the new garden soil in each garden bed section.
Here is the photo of the plants I bought.
Then, I planted the tomato plants under the tomato cage. These were plum tomatoes.

Now, I planted Parsley, Lavender, and Lemon verbena right near the sage and lemon balm. Lemon Verbena plant is a fragrant herb known for its lemony scent and flavor, milder than that of lemon balm. Herbs (affiliate) work well in this section due to the ample amount of sun (6-8 hours) that shines on this area.
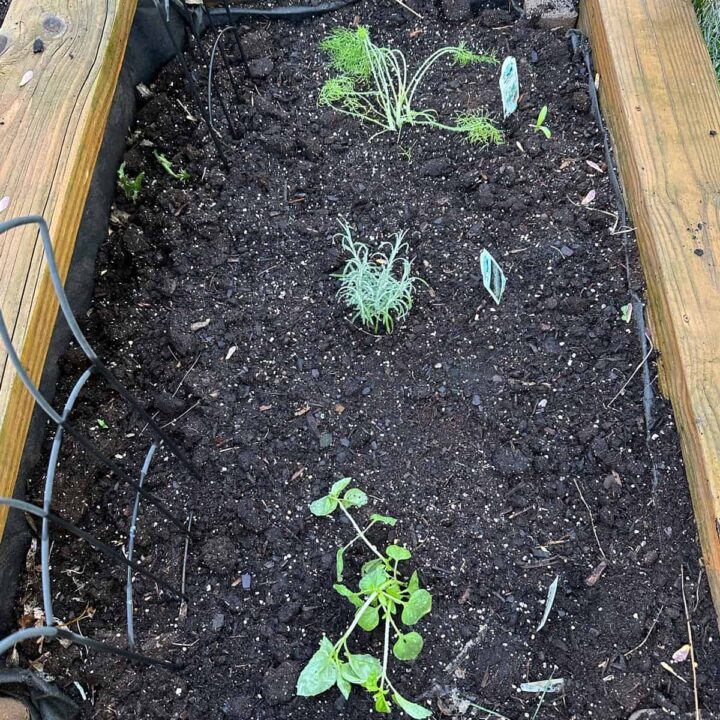
Next, I added the basil plant, curry plant, and fennel plant, ensuring there were lattices to support the fennel plant, which can grow quite large (affiliate) and encroach on the other plant areas.
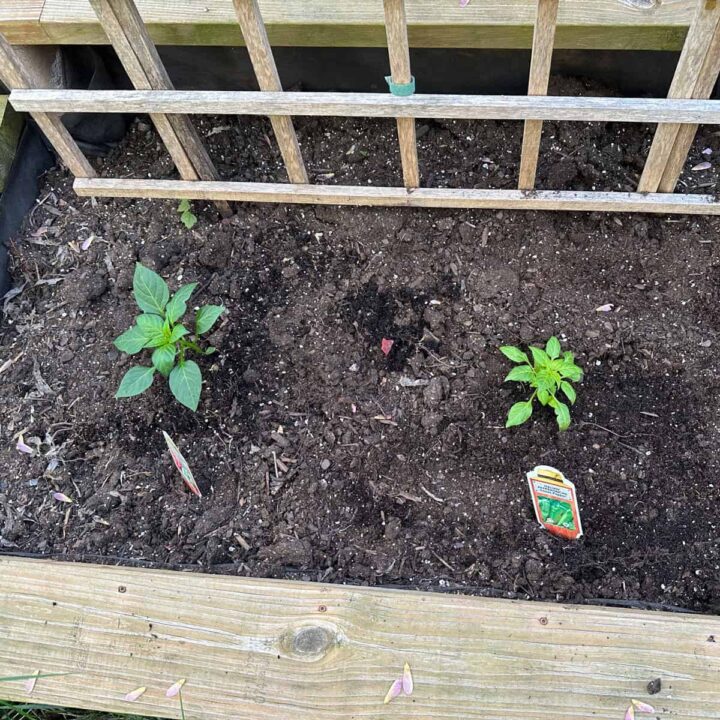
Lastly, I added the pepperoncini plant and Italian Sweet Pepper (affiliate) plant.
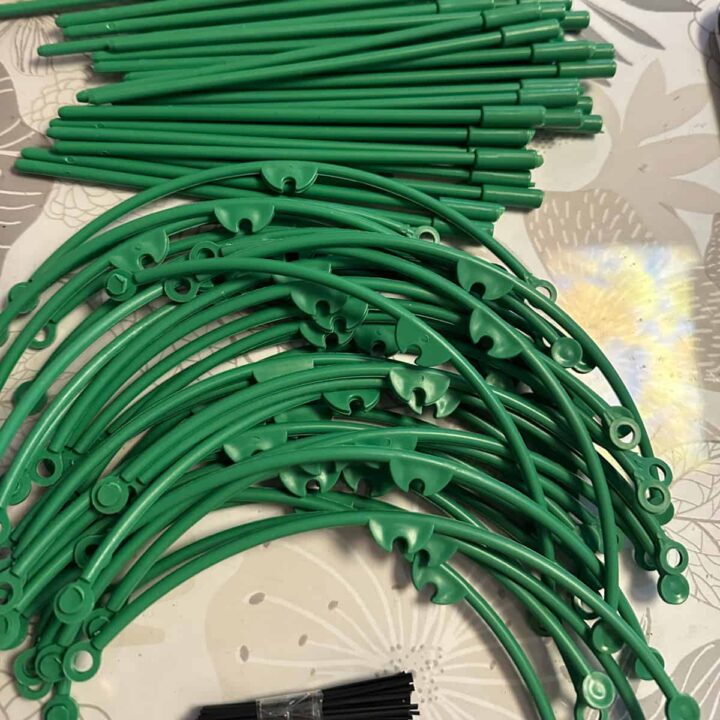
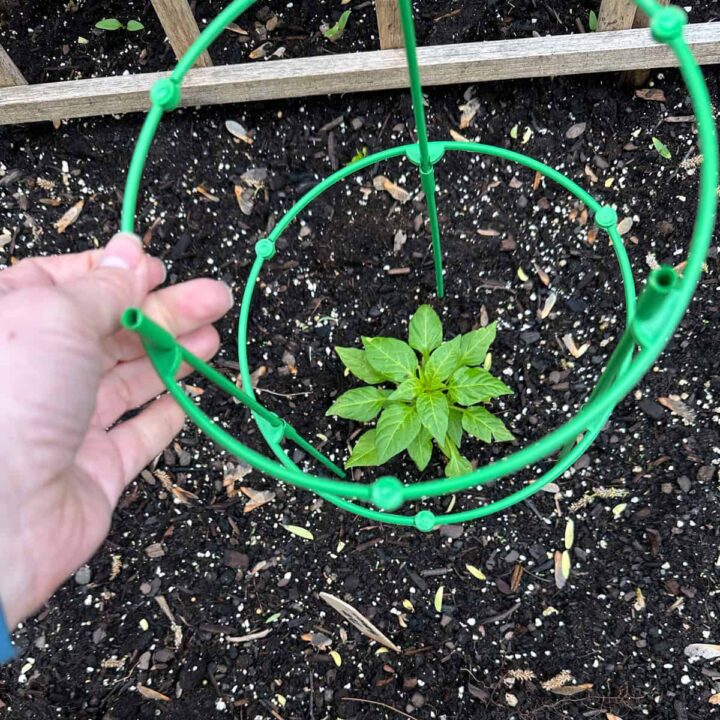
Each of these plants will grow quite large (affiliate), so I needed to ensure there were plant support stakes around each of them. I assembled each stake according to the instructions and placed them around each plant.
Here is what came in the pack of stakes.
Then, I added them to all the small plants. It is best to do this when they are small so that they grow within the area, and you do not need to work around the branches of the plants.
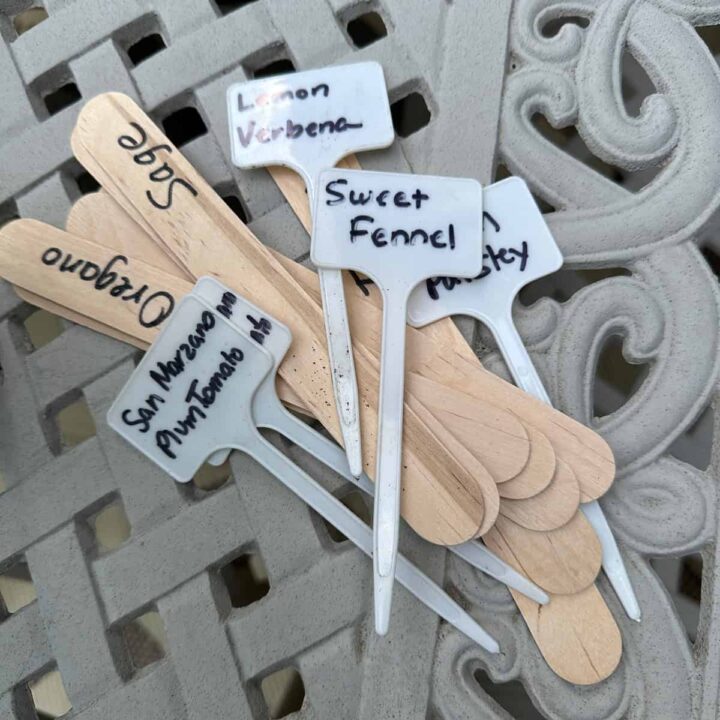
I then added tags to label (affiliate) each plant. Using popsicle sticks and plastic signs, I wrote the name of each plant on them and pressed them into the soil in front of each plant.
Frequently Asked Questions About Raised Bed Vegetable Gardens
Start by placing taller plants (like tomatoes and fennel) toward the back or north side of the bed so they don't shade shorter plants. Put smaller herbs and low-growing vegetables toward the front. Check each plant's spacing requirements on its tag or seed packet, and use companion planting guides (like the one from the Farmer's Almanac) to make sure your plants grow well together. I also recommend drawing your layout on paper before planting so you can visualize spacing and sun exposure.
Tomatoes, peppers, basil, and parsley are all great choices for beginners because they're relatively low-maintenance and produce well in raised beds. Herbs like sage, rosemary, and mint are also forgiving and come back year after year. I'd suggest starting with 5-8 plants your family actually eats rather than filling every inch of the bed - you can always expand next season.
If you already have the raised bed structure built, annual planting costs are quite reasonable. My setup this year - including plants, raised bed soil, stakes, labels, and a sprinkler timer - came to about $200. The biggest expense is usually the soil. You can reduce costs by growing from seed instead of buying starter plants, and by composting to supplement your soil over time.
Use soil specifically labeled for raised beds - it's different from in-ground garden soil. Raised bed soil is formulated for better drainage and nutrient levels in a contained environment. I use Miracle-Gro Raised Bed Soil and mix it into the existing soil each year. It's also a good idea to do a soil test before planting so you know if your garden needs any amendments.
Raised beds dry out faster than in-ground gardens, so consistent watering is important. I water my garden for about 10 minutes each day using a sprinkler connected to a B-hyve smart timer - it programs automatically, so I don't have to remember. In very hot weather, you may need to water twice a day. Check the soil by sticking your finger about an inch deep; if it's dry, it's time to water.
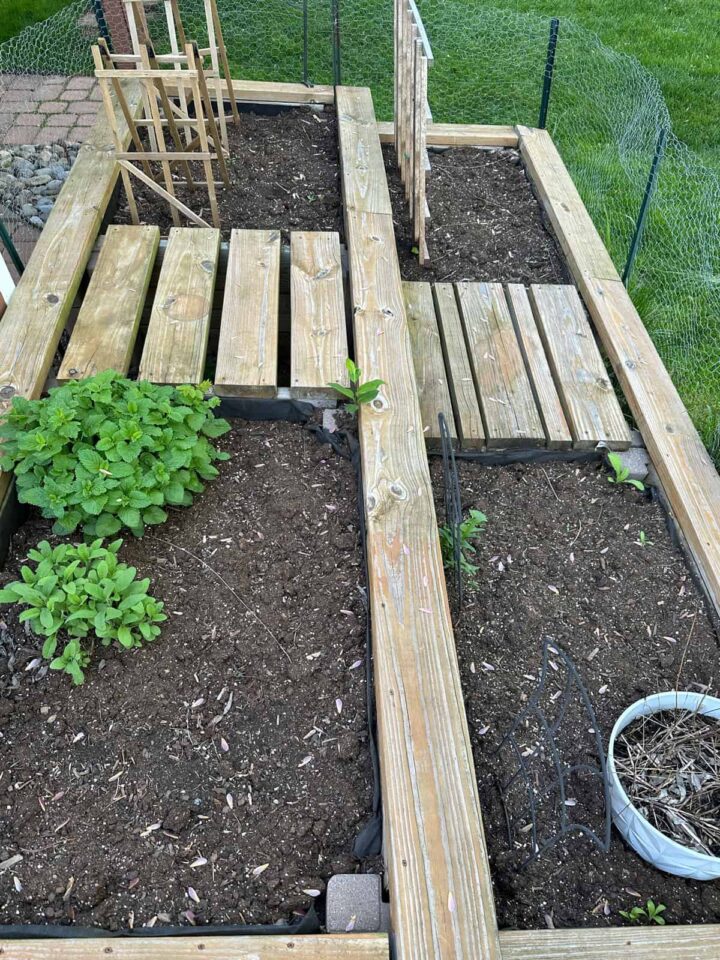
The Big Reveal
This well-organized vegetable garden looks lovely. What do you think? Our garden has maximized the use of plants within a small backyard space. We are expecting a bountiful harvest this year. Stay tuned to see what happens next year.
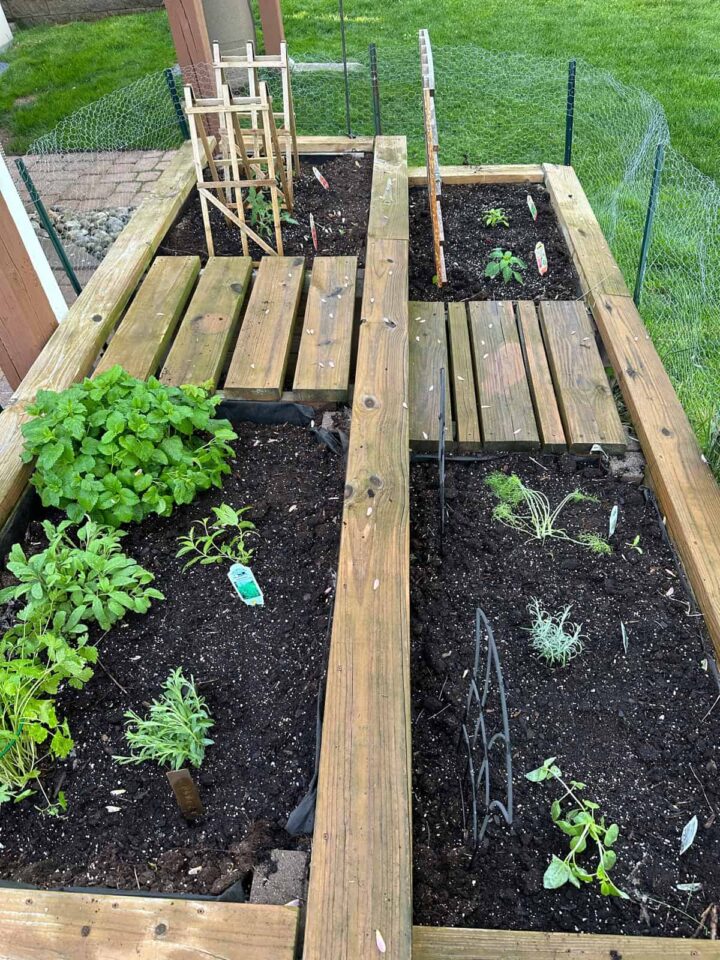
This is a viewpoint from the top of the vegetable garden.
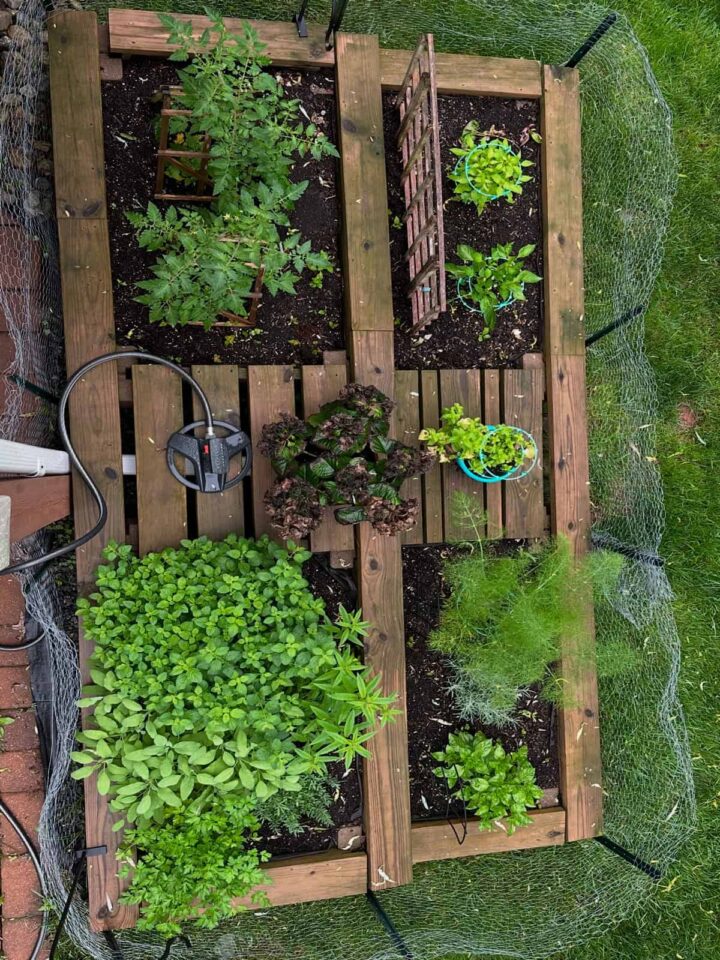
3 months later, the vegetable garden has grown
Below is a photo of the garden after regular watering using a B-hyve app, which allows us to program the sprinkler for about 10 minutes each day. This makes it easy, and I no longer need to water the vegetable garden daily. What a great investment.
What else should I know when creating a Well-Organized Vegetable Garden?
Below are some additional information you may need to know when maintaining a vegetable garden that I found helpful.
- Have a plan - list all the plants you want to add to the garden. Going to the garden center without a plan can cost you a fortune and may be more frustrating, especially if you buy plants that can not be planted near each other.
- Visualize by drawing out on paper where the plants will go, looking up their details online to see how large (affiliate) they grow, whether they can be placed near other plants, and whether they are perennials. If it returns each year, you will need to understand this before planting. If you use AI, be sure you find out the source of the information.
- Get the family involved - it's so much fun when you garden together. And the work gets done quickly. While the kids may not want to participate, when they get older, they will appreciate that you took the time to show them how to garden. I have two kids who now enjoy the garden, but didn't want to take part when they were younger.
- It is OK to cut back the plants - If some of the plants are getting too large (affiliate) and the vegetable isn't growing, cutting back the branches may redirect the plant's energy to produce more vegetables instead of foliage.
- Check the tags on the plants - Be sure to review the water requirements for the plant, how often it needs to be fed, and the amount of sunlight it needs for efficient use of space.
I hope this post helps you create a well-organized vegetable Garden. Let me know if you have any questions about my example. I would love to hear from you, not just bots. Lol - Happy gardening!
Looking for more inspiration? Below are my recent posts to help you organize the outdoor and garden