I am a self-proclaimed genealogist for my family. When I was about 15, I visited Italy with my family and started documenting dates, stories, and family history from various family trips to Italy. Interviewing my grandparents and parents, I created a paper genealogy book and added several details. Over the years, this genealogy book was expanded to include my husband's side of the family and updated to Family Tree Maker software, where we now have nearly 500 family members. When my mother moved away, she gave me all the photos to organize. While going through them, I realized it would be great to make a book for my kids to show them who their relatives were. So, this post will share how I created our heritage scrapbook (affiliate), and hopefully, it will help you start your own version.
Jump to:
- What is a heritage scrapbook?
- Questions to Ask Yourself BEFORE Starting a Heritage Scrapbook
- Here's how to create a heritage scrapbook.
- How do I decorate the heritage scrapbook pages?
- Start with your immediate family
- After finishing the immediate family, it was time to add the extended family.
- Event Photos Pages
- Add Title Pages to Divide the Scrapbook.
- Add a page that holds the kinship report for the recipients.
- Now it is time to add Stories to the Scrapbook Pages.
What is a heritage scrapbook?
It is a multi-generational family photograph and mementos. It includes information about their ancestors' family history, culture, and traditions.
Get your FREE copy of this heritage scrapbook (affiliate) guide by signing up for our newsletter and receiving all of our ebooks as well.
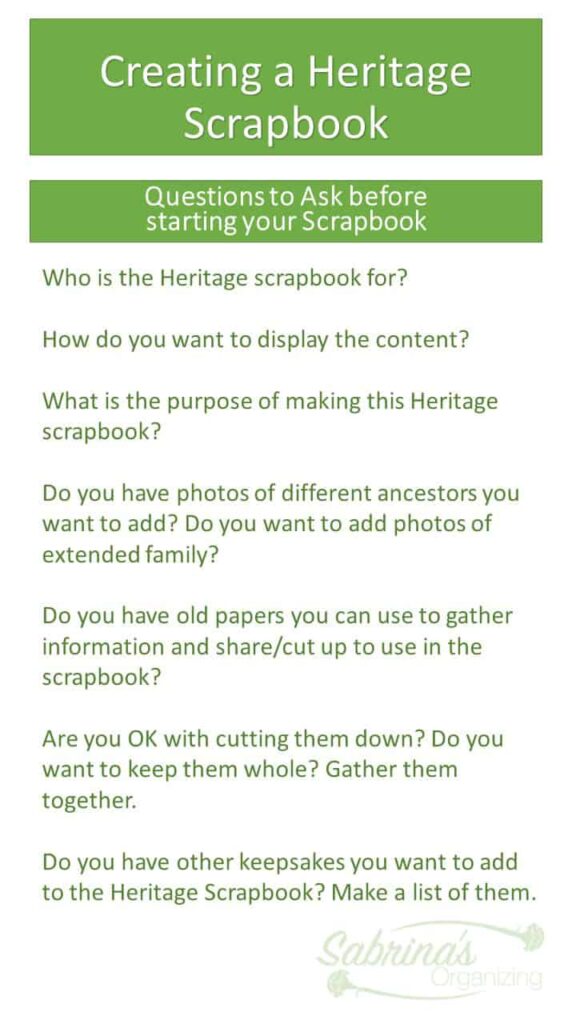
Questions to Ask Yourself BEFORE Starting a Heritage Scrapbook
Q1: Who is the heritage scrapbook (affiliate) for?
Q2: How do you want to display the content?
Q3: What is the purpose of making this heritage scrapbook (affiliate)?
Q4: Do you have photos of different ancestors you want to add? Do you want to add pictures of extended family?
Q5: Do you have old papers to gather information and share/cut up to use in the scrapbook (affiliate)? Gather them together.
Q6: Are you OK with cutting them down? Do you want to keep them whole?
Q7: Do you have other keepsakes you want to add to the Heritage Scrapbook?
After determining what will be in the heritage scrapbook, gather all the items together, and it's time to set up the scrapbook.
Here's how to create a heritage scrapbook.
Divide the pictures, photos, passports, and documents into piles and add a sticky note with their names to each pile. This will give you a starting point for each page(s).
When finished, it is time to assemble the heritage scrapbook pages.
How do I decorate the heritage scrapbook pages?
First, you can use scrapbook stickers like hearts, flowers, city names, and borders, or even design your own with a Cricut Maker to decorate the pages. I have combined all of these over the years.
Please note these are affiliate links through Amazon, and at no additional cost to you, I will earn an affiliate commission if you click through and decide to make a purchase.
Start with your immediate family
I started with the immediate relatives and children and worked my way to the extended family.
I started dividing my scrapbook by the families: my side and my husband's side. Then, I allocated at least one page per family member (grandma had a page, granddad had a page, etc...); and, then, when I didn't have enough information on a particular side of the family, I added a general "surname page" for family members. This way, when I placed them on the pages, I could organize them easily.
The first pages can be of the father's or the mother's side. Adding extra pages because there will probably be more photos from these people.
Then, move to the grandparents on both sides. One side of each page allows for extra space on the backside for interviews, papers, and comments. I added photos and cutouts of things they enjoyed doing. For example, I cut out the stamps from my father's passport to show all the countries he visited.
The image below shows the layout of the first part of the scrapbook. As you can see, I had the most content (photos, memorabilia, etc...) for my immediate relatives.

After finishing the immediate family, it was time to add the extended family.
Each extended family (by surname) had at least one page (front and back). I spread the picture enough to add stories, dates, and facts to the pages.
Adding group photos of the extended family works because you can share information in just one picture.

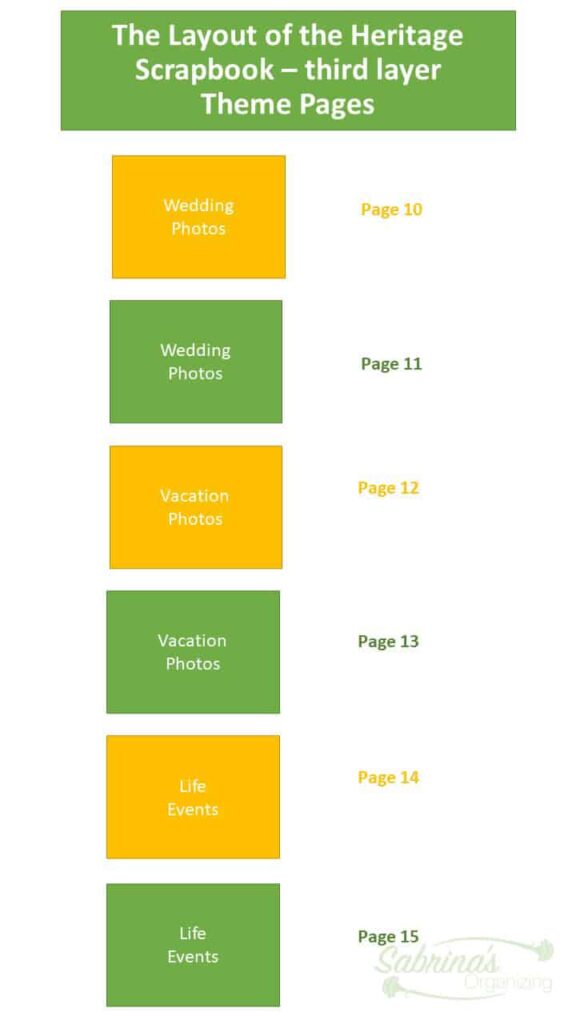
The following page themes involve life events that you may have just one picture of and want to put together to create a theme page.
Event Photos Pages
Have several photos of particular events; why not gather them together and make a scrapbook page?
You can even create life event scrapbook pages. Some people only have one picture of a couple or group, so theme pages work well for these photos. Here are just some life events you can start with.
The Family Weddings page.
Gather all the family wedding photos and add them to a few pages, or split them up by family lineage.
Family Vacation page.
If a family is on a once-in-a-lifetime vacation trip, you can create a page just for that vacation.
Trips to a particular country that everyone visited.
If everyone went to Italy or Greece, gather the group pictures of those who went to that country and share them on a page.
A vacation home family trip page.
If a family has a vacation home that everyone has visited, you can add all the photos from the families that have visited the house over the years.
Creating photos for life events gives the page a purpose, even though the pictures may be of different times. Be sure to include the date, names of people, and their location, if known.
Add Title Pages to Divide the Scrapbook.
If you want to divide the book into sections, you can create a title page in the scrapbook. Some title pages could be.
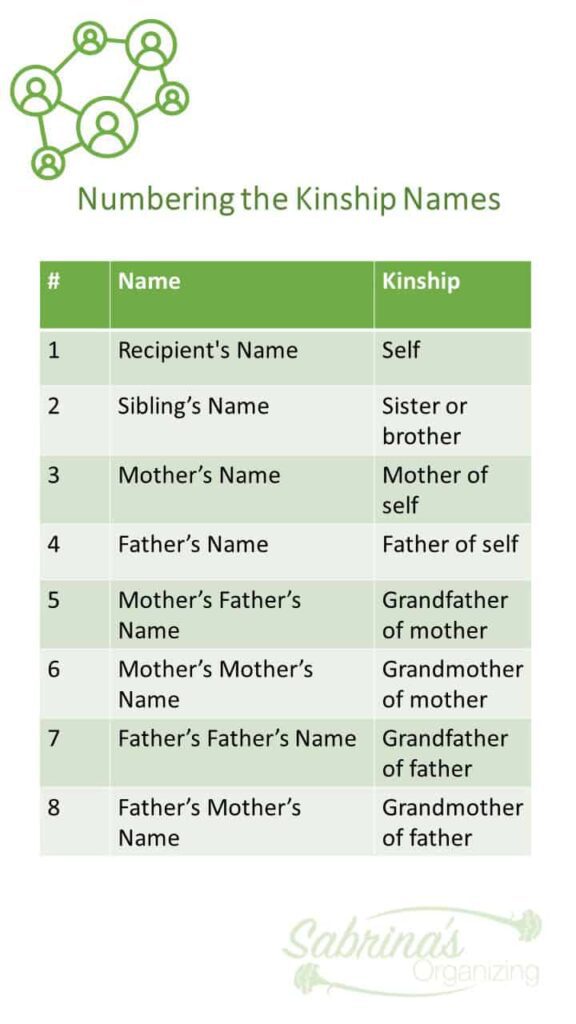
Add a page that holds the kinship report for the recipients.
Printing out a kinship report from your ancestry app places the list of relatives in order by relating to the heritage scrapbook recipients. You can even number the report to correspond to the pages so that the reader can see the person's relationship with the people in the photo. For example, Number 6 was my mother's photo, so wherever she was, I added a number 6 above or below the pictures so my kids would know the person.
Now, I was ready to number each person about what it said on my Kinship report.
How do you number the items in the kinship report list?
To help each reader understand their relationship with the people in the photo, we added numbers next to each picture to reference them in the kinship report, with the number placed near the person's name.
A page that shares the two family names.
For example, "Morresi and Quairoli" would be on one page. The pages of the Morresi and Quairoli families would follow this title page, separating the family units from one another.
Now it is time to add Stories to the Scrapbook Pages.
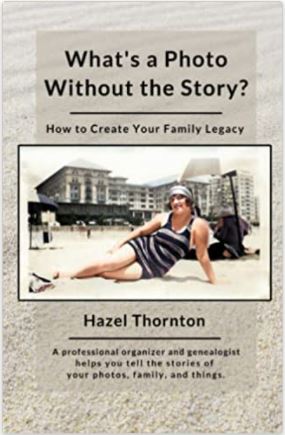
To make a scrapbook informative and enjoyable, add stories to help you. A genealogy expert, Hazel Thornton, wrote an excellent how-to book called "What's a Photo Without the Story? How to Create Your Family Legacy." Feel free to buy it on Amazon (affiliate) (affiliate). You can buy it in paperback or on Kindle. It discusses various story (affiliate) writing methods, from low to high effort. She even has questions to help determine what to include for each photo. And even if there is no information about the photo, she shares some tips on figuring out what the photo is related to. Additionally, you may need various other pieces of information and tips when working on your photos.
Note: Adding stories to this process takes time. I haven't gotten through all my photos and scrapbook pages yet, but I have started and will continue this process.
Other tips and information:
Here are some tips to help you when making your heritage scrapbook.
- Use only one side of each page for each family member. That way, you have some space on the back if you have more information.
- Use a larger scrapbook—a legal-size scrapbook works great. It will give you more room to add photos and stories.
- Make sure the pages are sturdy. I had a scrapbook with very thin pages, and when I started to turn them, they began to rip out of the book.
Updated in 2025: Ask living ancestors questions, write down the responses, and then add to the book.
Add these questions and the ancestor responses to your scrapbook. Below are some questions that may enrich your family's stories.
Q1: What values and beliefs did your parents teach you?
Q2: Did your parents discipline you when you misbehaved? How did they do that?
Q3: What did you want to be when you grew up?
Q4: Did you have a favorite subject in school?
Q5: What was special about your childhood home?
Q6: Which holiday traditions did you have when you were a child?
Q7: Did you have pets? What were their names?
Q8: Where did you meet your husband?
Q9: How did you get into your career?
Q10: What did you love about your parents?
Q11: Did your mom or dad cook special meals that you loved?
Q12: What did you do when President John F. Kennedy was shot, D-Day, Pearl Harbor, or 9/11?
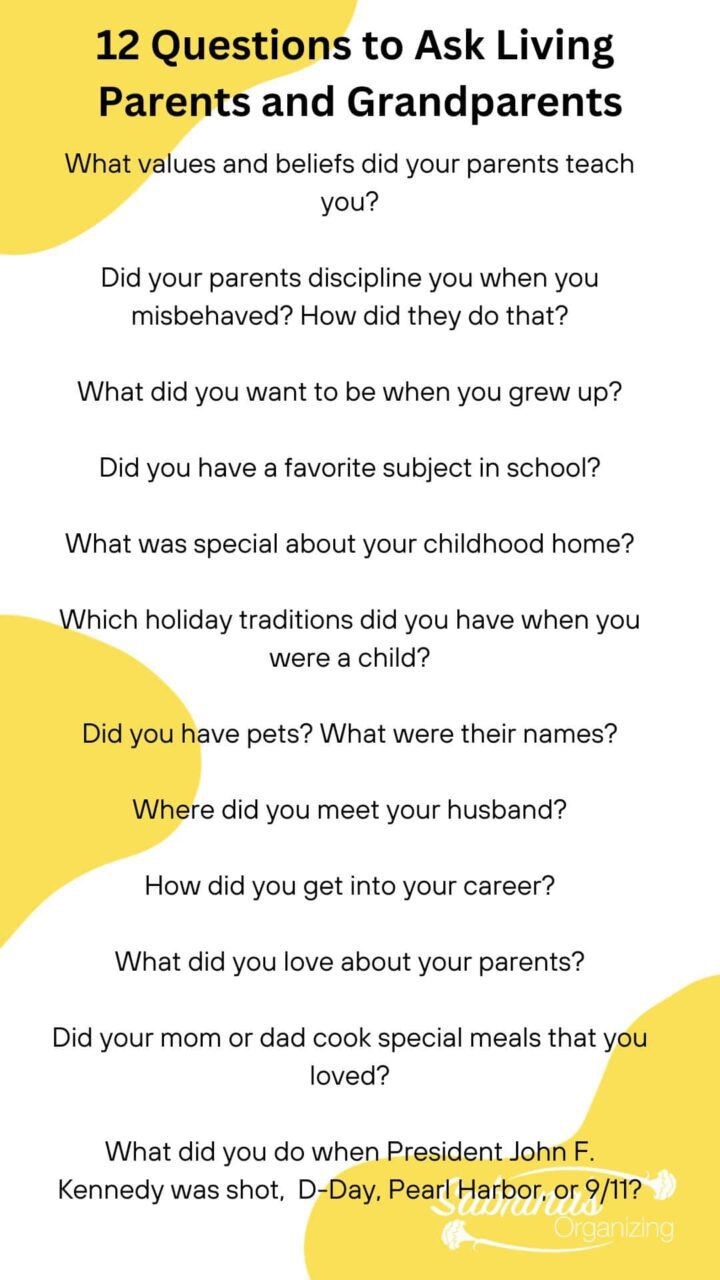
I hope these questions help you enrich your storytelling for each member of your heritage scrapbook.
Check out the video to see how my scrapbook was created. I didn't share all the pages because some of them contained personal information.
Now it is your turn! What would you add to your heritage scrapbook? Please leave a comment below.
Please visit some of the related posts below for more inspiration and ideas.
7 EASY HOME MOVIE ORGANIZING TIPS
HOW TO IMPROVE A SCRAPBOOKING CABINET ZONE
HOW TO MAKE A STANDING SCRAPBOOKING STATION
WHAT MEMORABILIA TO KEEP TO HONOR LOVED ONES
8 AMAZING IDEAS TO HONOR YOUR MEMORABILIA
Please note that these are affiliate links through Amazon. At no additional cost to you, I will earn an affiliate commission if you click through and decide to make a purchase.
Visit our other keepsake organization ideas!

Lucy Kelly says
There's something about a tangible scrapbook you can hold in your hands. You can feel the history. I've done this for our families and it's definitely a labor of love.
Janet Schiesl says
You explained the structure of your book so well. I'm not into making books but I have a wall of family photos in my dining room. I wrote the name of the people in each photo on the back and have a small family tree hanging up as well. My sister did an extensive family tree many years ago It's wonderful.
Julie Bestry says
Wow, I love that you made a tangible scrapbook rather than a newfangled digital one. I was fascinated each step of the way. The family line ends with me, and there are relatively few photos from before the 1940s/1950s (of my parents), so this isn't a project for me, but I'd definitely share this with my clients. (But I'm shuddering at the idea of cutting up the passport to show the stamps. Eek! I suppose I would have glued the back of the passport to a page and made it 3D, but of course that would have made for a lumpy scrapbook! I guess I'll leave this kind of project to the pros.)
Sabrina Quairoli says
I feel your pain about the passports. They were in this scrapbook for about 15 years before I decided to do something different. They were so heavy that the pages ripped out of the book, hence why I wanted to do a revamp of this scrapbook.
Linda Samuels says
What a labor of love! I like that you went old school and made a highly tactile version as opposed to making a digital book. While I haven't made a scrapbook specifically on our ancestry, I've made many books over the years. Some were tactile and others were digital.
This will be a gift that your family can enjoy for generations to come.
Sabrina Quairoli says
It was a labor of love! I did scan the pages in and kept them on a different photo album section on my server so I have a digital version of it as well.
Nancy Haworth says
A family heritage scrapbook is such a great idea! It is so much better than just storing those items in boxes, never to be seen, which I see often when working with home organizing clients. Thanks for sharing these detailed tips and the video of your family's scrapbook, it looks wonderful!
Sabrina Quairoli says
I think so too. Seeing photos in a particular order with a theme makes it so enjoyable. I love looking through it and sharing photos online when a birthday or anniversary comes around. A quick snapshot and it can easily be shared with others.
Melissa Gratias says
What an amazing resource, Sabrina! I love to make photobooks but never knew what to do with all the old photographs I have of my ancestors. Thank you so much.
Sabrina Quairoli says
Themes are a great way to gather old photos. We can usually figure out what the images are by looking at them.